Documentation
PDF CreateMate seamlessly integrates with various HubSpot objects, enhancing your document management capabilities. Our tool now supports both Standard and Custom objects, providing greater flexibility for your business needs.
Standard Objects
By default, PDF CreateMate supports the following standard objects: Contact, Company, Deal, Ticket
Custom Objects
We’ve extended our support to include custom objects in PDF CreateMate. Custom objects allow you to create specialized categories beyond the standard ones, giving you more control over how your data is organized and utilized.
Enabling Object Support
- New users: Support for both standard objects (Contact, Company, Deal, Ticket) and custom objects is enabled by default for all new users.
- Existing users: If you’re an existing user, support for additional HubSpot objects, including custom objects, is not automatically enabled. To enable these features:
- 1. Go to Settings.
- 2. Click on Reconnect HubSpot.
- 3. You'll be prompted to authorize PDF CreateMate with a new set of permissions.
- 4. Confirm the permissions, and you'll be all set to use both standard and custom objects.
- Begin by registering on the PDF CreateMate platform if you haven't already.
- After registration, activate your account using the link sent to your registered email.
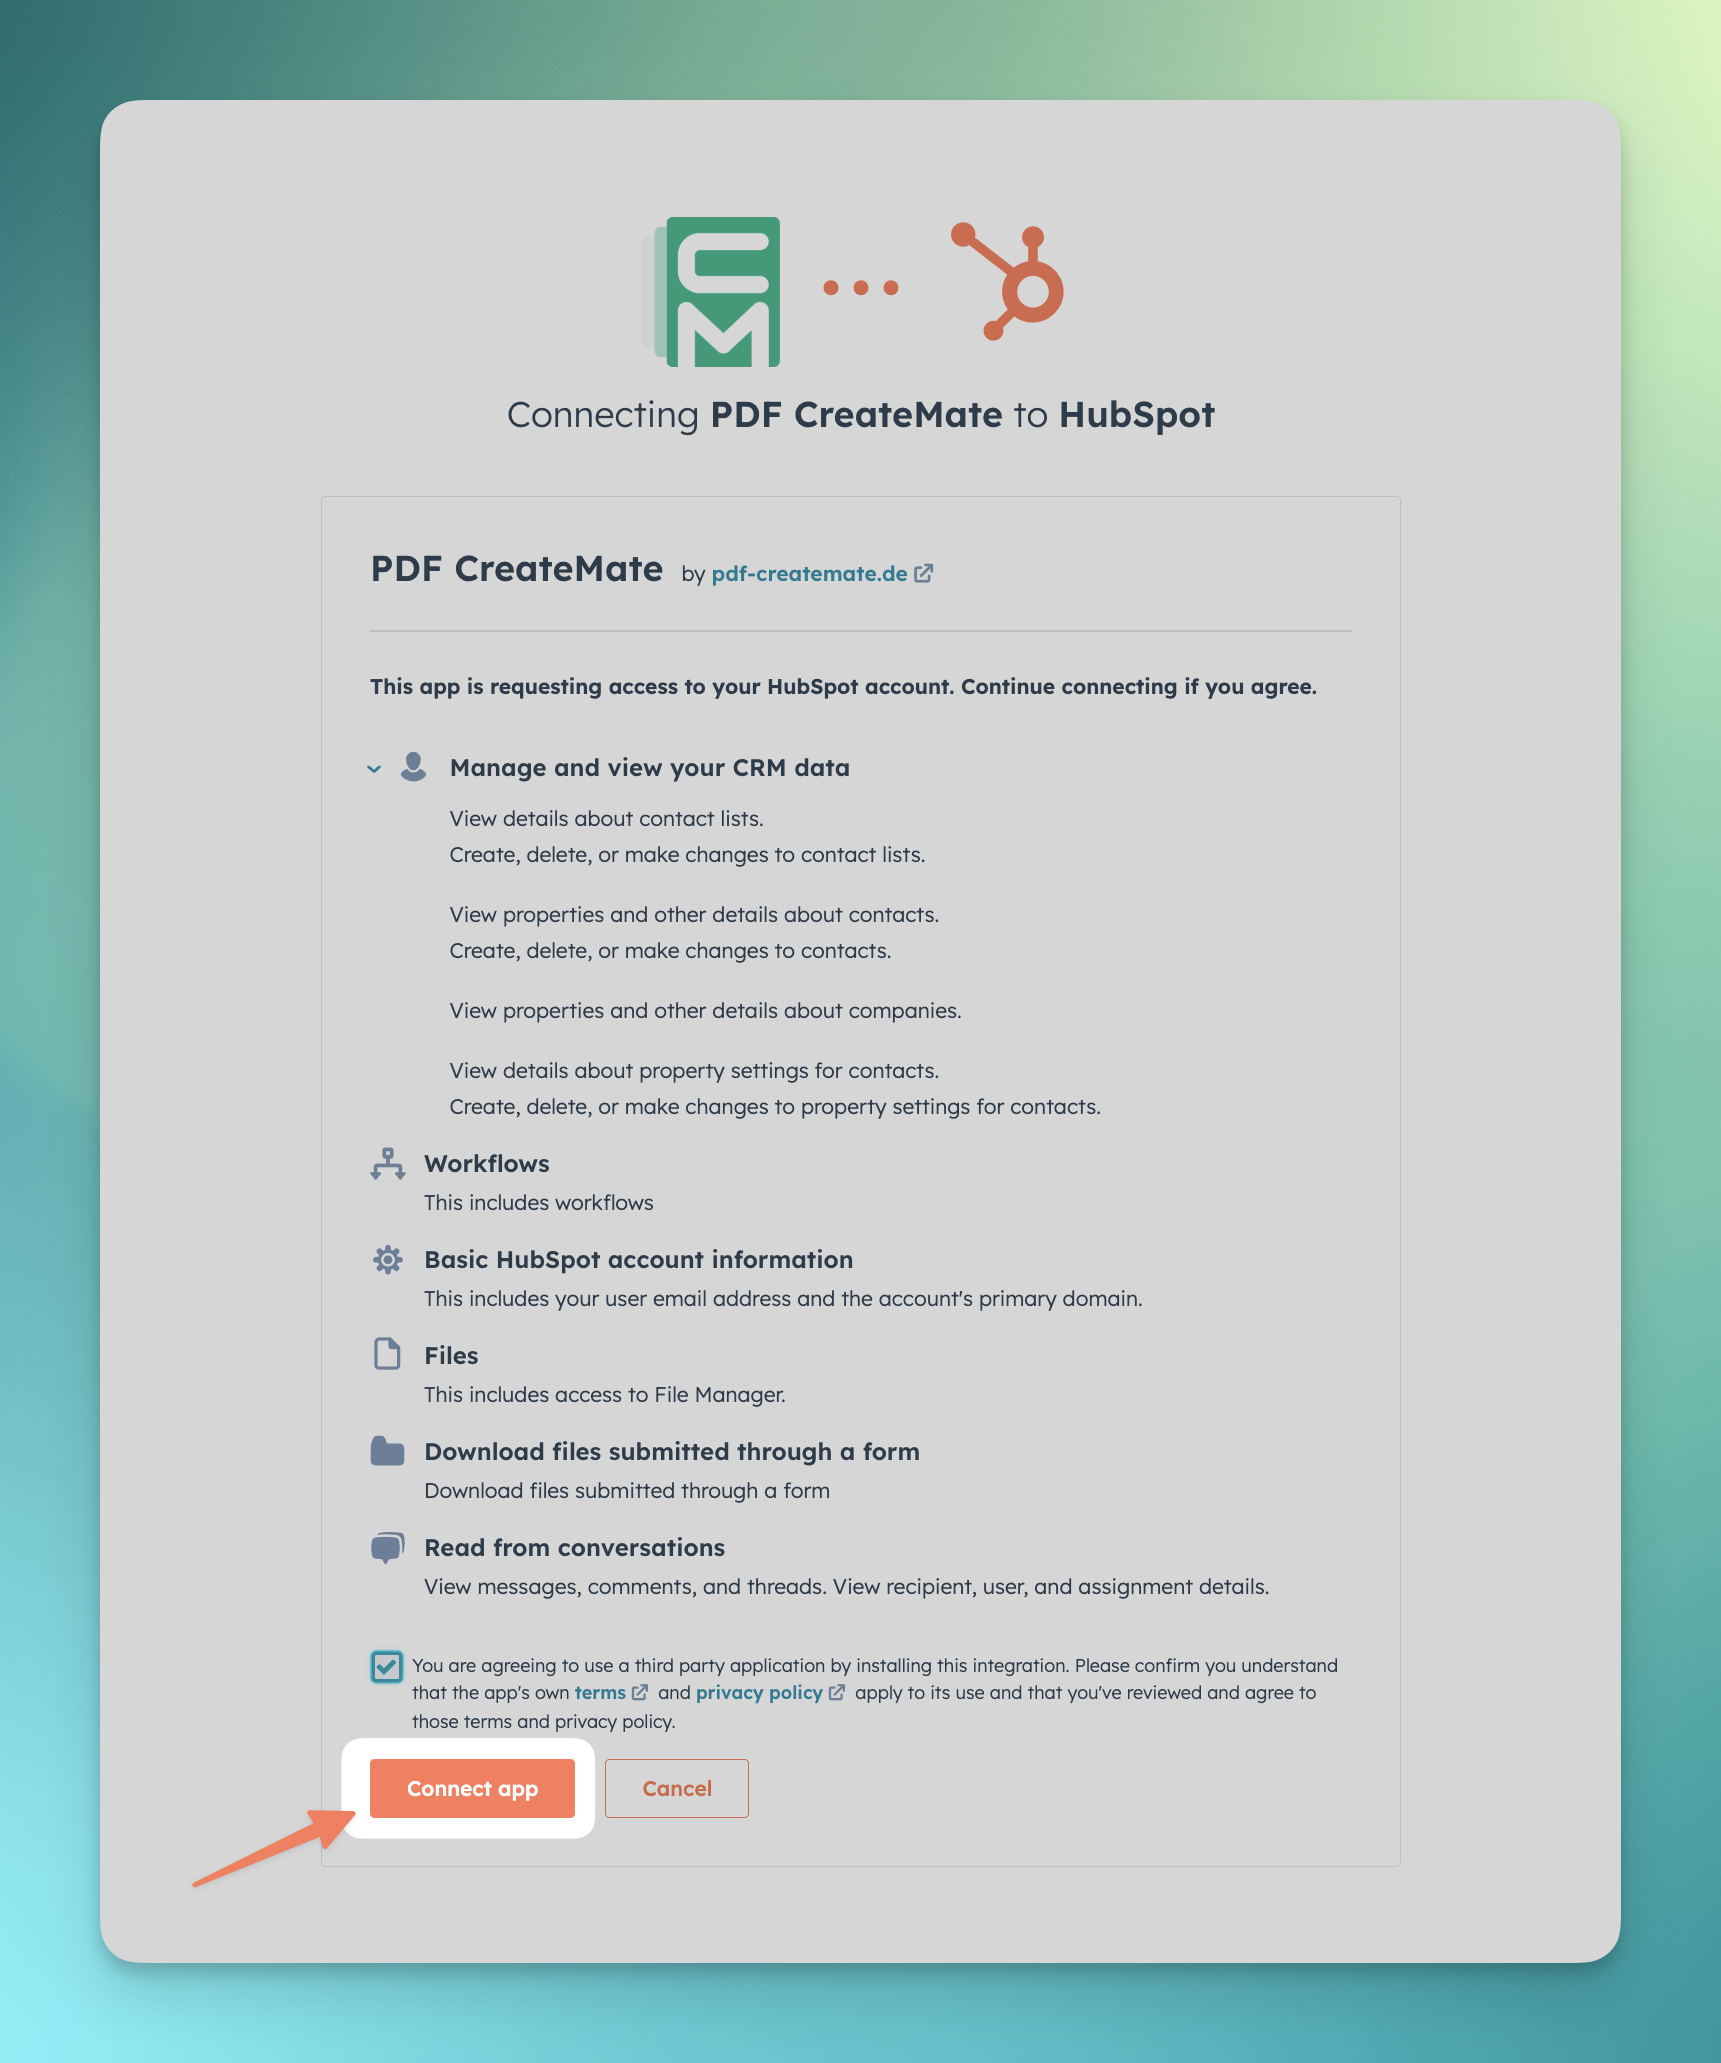
- After activation, on the prompted screen, click the 'Connect HubSpot account' button.
- If you're not already logged into your HubSpot account, a login prompt will appear. Enter your HubSpot credentials to proceed.
- If you have multiple accounts, choose the specific HubSpot account you wish to connect with PDF CreateMate.
- A list of permissions that PDF CreateMate requires will be displayed. Thoroughly review these permissions to ensure you understand what access you're granting.
- Once you're comfortable with the permissions, click on the 'Connect app' button to finalize the connection.
- After successful connection, you'll be automatically redirected back to the PDF CreateMate platform.
- An onboarding tour will initiate to guide you through the features and functionalities of PDF CreateMate. It's recommended to take this tour to familiarize yourself with the platform.
- Start by either creating a new document file or opening an existing one. Remember, it must be a Word document.
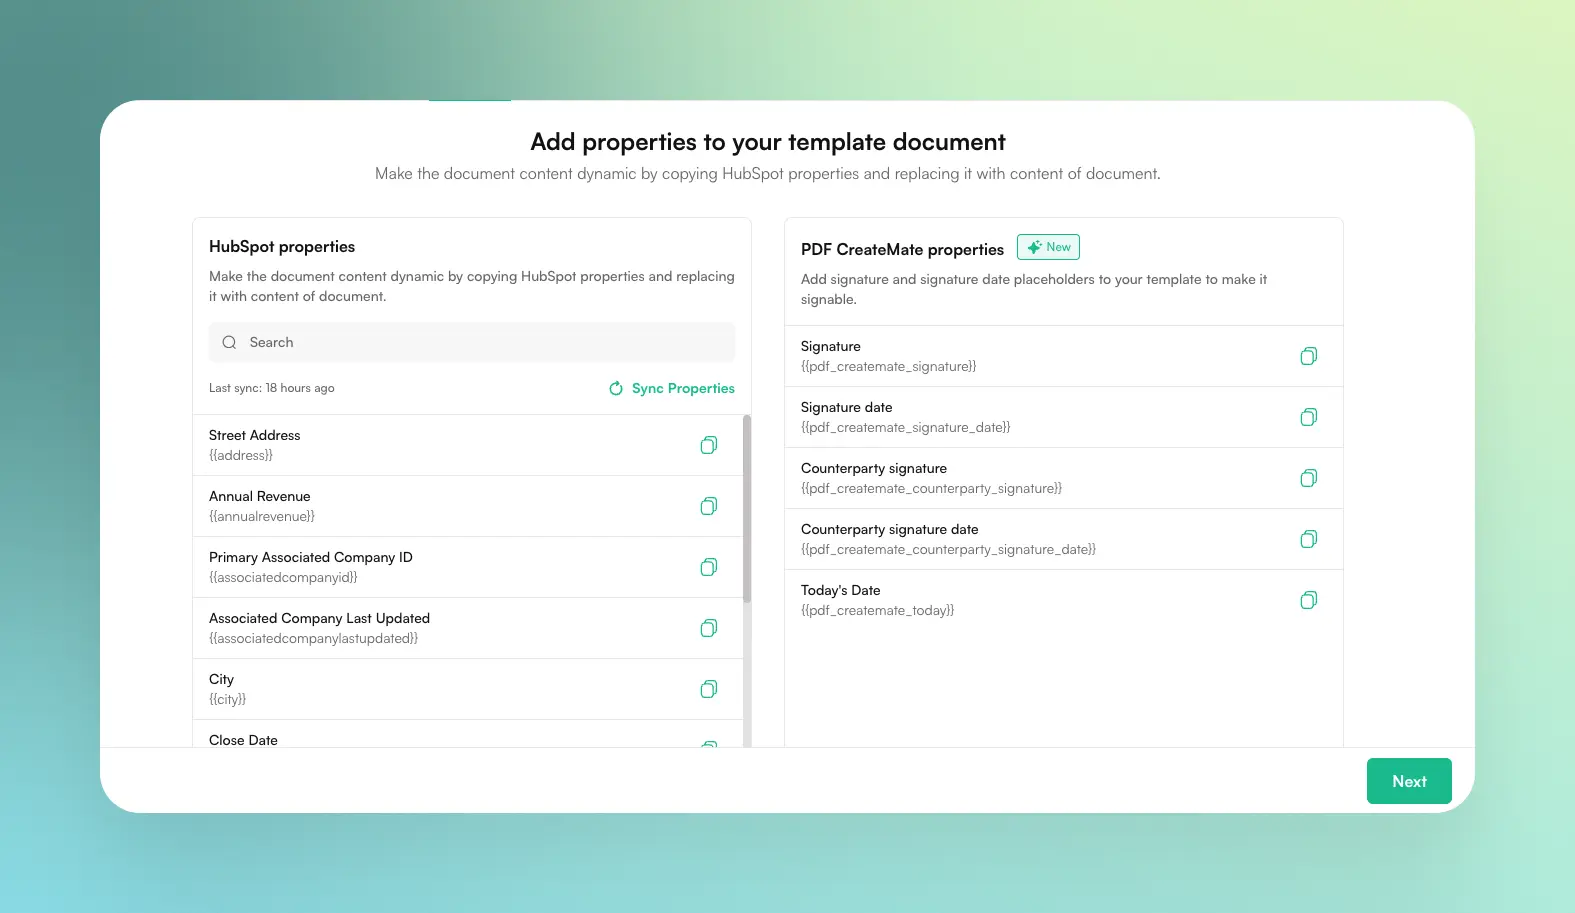
- Visit Properties to search and copy HubSpot contact properties by simply clicking on copy.
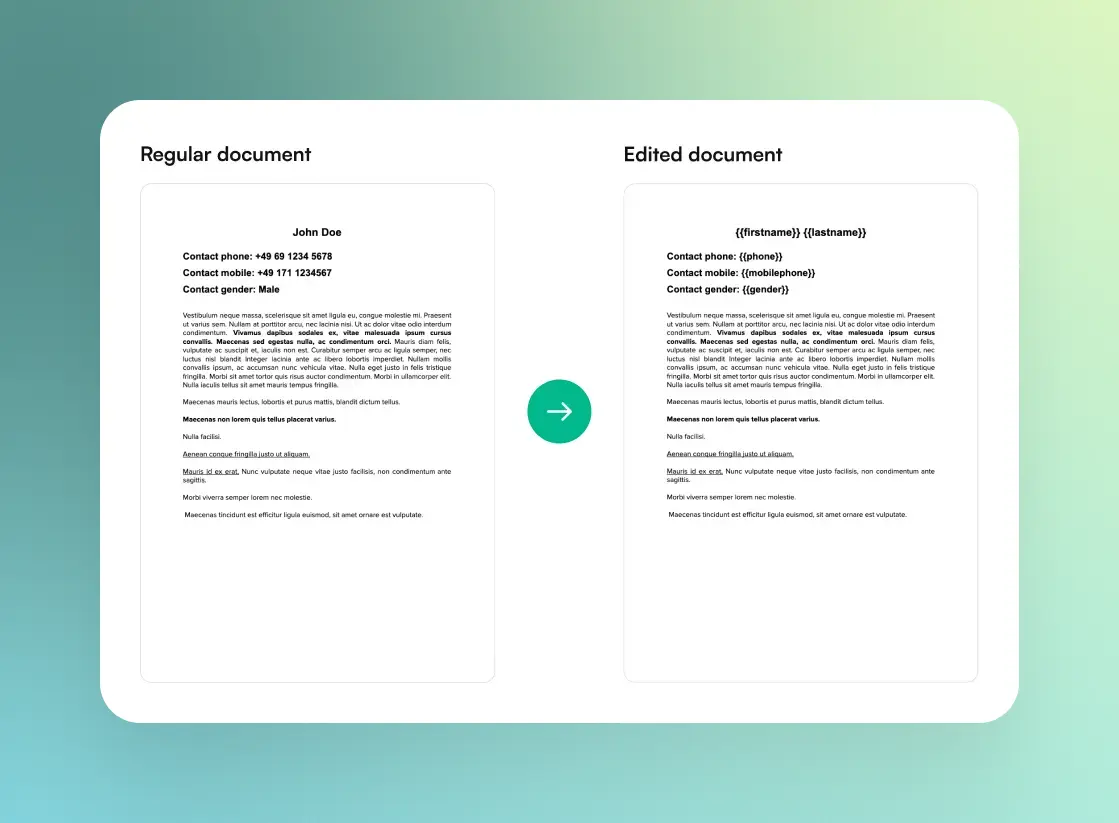
- In your document, identify and replace static text with the copied HubSpot contact properties.
- After ensuring all necessary text replacements have been made, download or save your document in the .docx format.
{{revenue}}€. If {{revenue}} is 100, the output will be shown as 100€.
Conditional blocks support standard comparison operators to evaluate properties in your templates. You can use: ==, !=, >, <, >=, <=.
Use conditional blocks to render content only when a condition is met. Copy the snippet below and adapt the property names to your template See example.
Example 1: Simple condition (without else block)
When: has_consent equals 'True'
Then: Shows "You have accept the policy consent."
    {% if has_consent == 'True' %}
        You have accept the policy consent.
    {% endif %}
Example 2: Not equal to (!=)
When: closedate is NOT '29-12-2025'
Then: Shows "Your deal is still active and open for updates."
Otherwise: Shows "Your deal has reached its closing stage."
    {% if closedate != '29-12-2025' %}
        Your deal is still active and open for updates.
    {% else %}
        Your deal has reached its closing stage.
    {% endif %}
Example 3: Greater than (>)
When: followercount is more than 100
Then: Shows "You have unlocked new perks!"
Otherwise: Shows "Gain more followers to unlock perks."
    {% if followercount > '100' %}
        You have unlocked new perks!
    {% else %}
        Gain more followers to unlock perks.
    {% endif %}
Example 4: Less than (<)
When: numemployees is less than 50
Then: Shows "Your company qualifies for small business benefits."
Otherwise: Shows "Your company is classified as medium to large enterprise."
    {% if numemployees < '50' %}
        Your company qualifies for small business benefits.
    {% else %}
         Your company is classified as medium to large enterprise.
    {% endif %}
Example 5: Greater than or equal to (>=)
When: hs_analytics_revenue is 1000 or more
Then: Shows "Revenue goal achieved. Enjoy the rewards!"
Otherwise: Shows "Increase revenue to reach your next goal."
    {% if hs_analytics_revenue >= '1000' %}
        Revenue goal achieved. Enjoy the rewards!
    {% else %}
        Increase revenue to reach your next goal.
    {% endif %}
Example 6: Less than or equal to (<=)
When: days_to_close is 30 or less
Then: Shows "This deal is on track for quick closure."
Otherwise: Shows "This deal may require additional follow-up."
    {% if days_to_close <= '30' %}
        This deal is on track for quick closure.
    {% else %}
        This deal may require additional follow-up.
    {% endif %}
- Refer to the Create personalized template section to create and edit a personalized template.
-
Navigate to Import Template
to start the upload process.
- Click 'Browse files' and select your .docx document from your device.
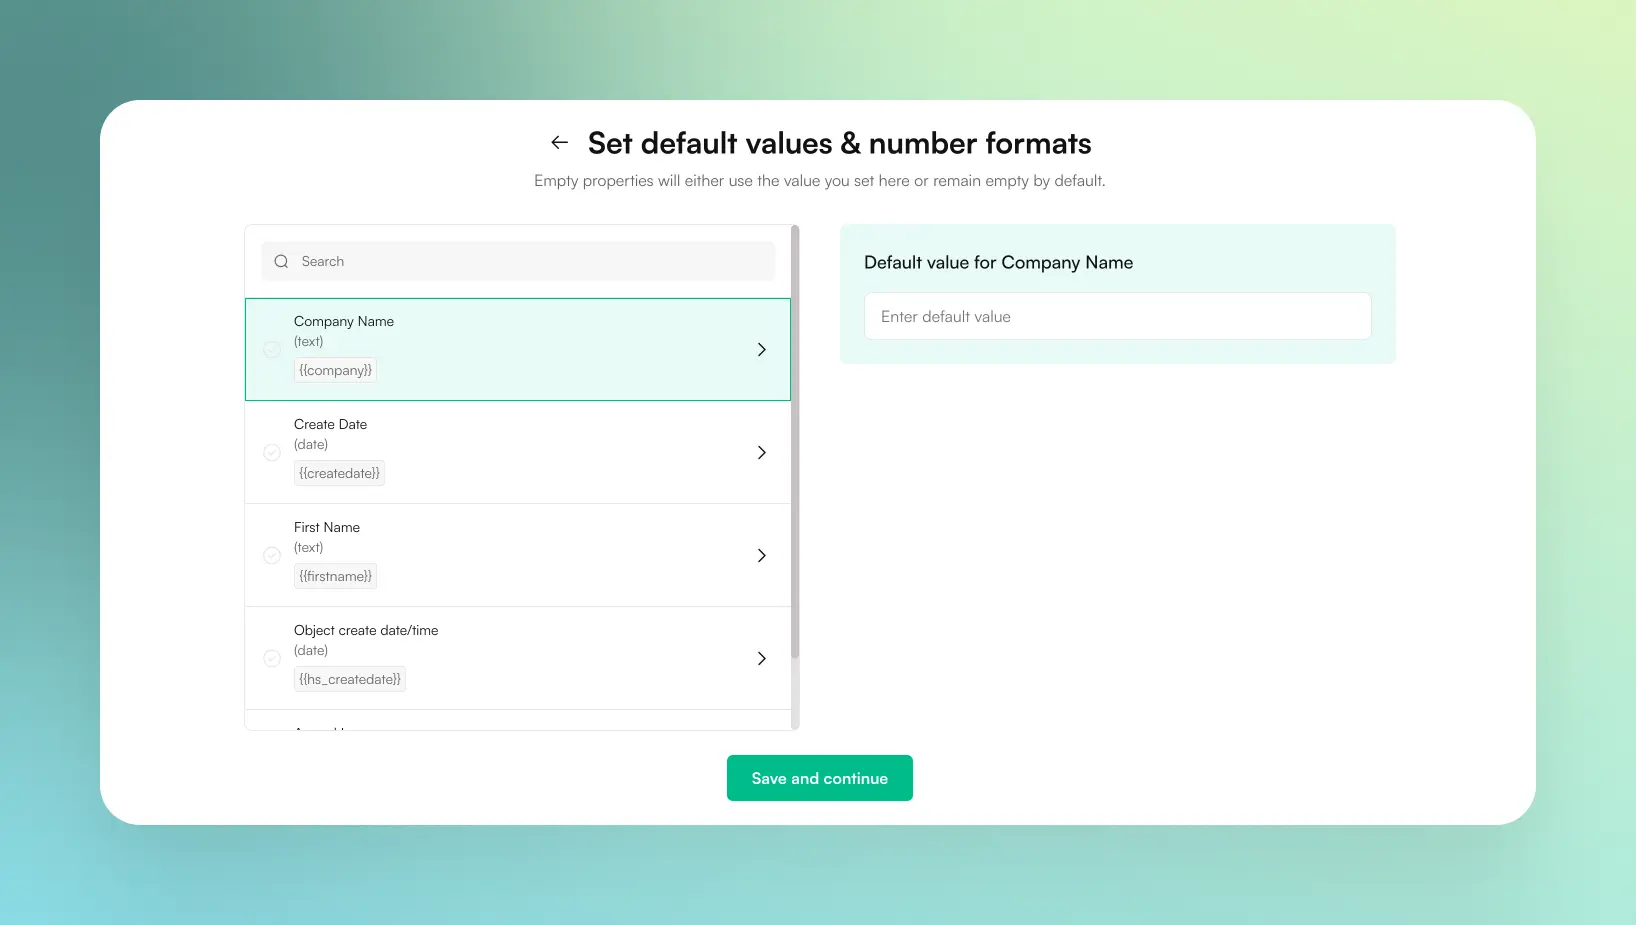
- Optionally, set default values for any dynamic properties you've incorporated into your document. Once done, click 'Save and continue.'
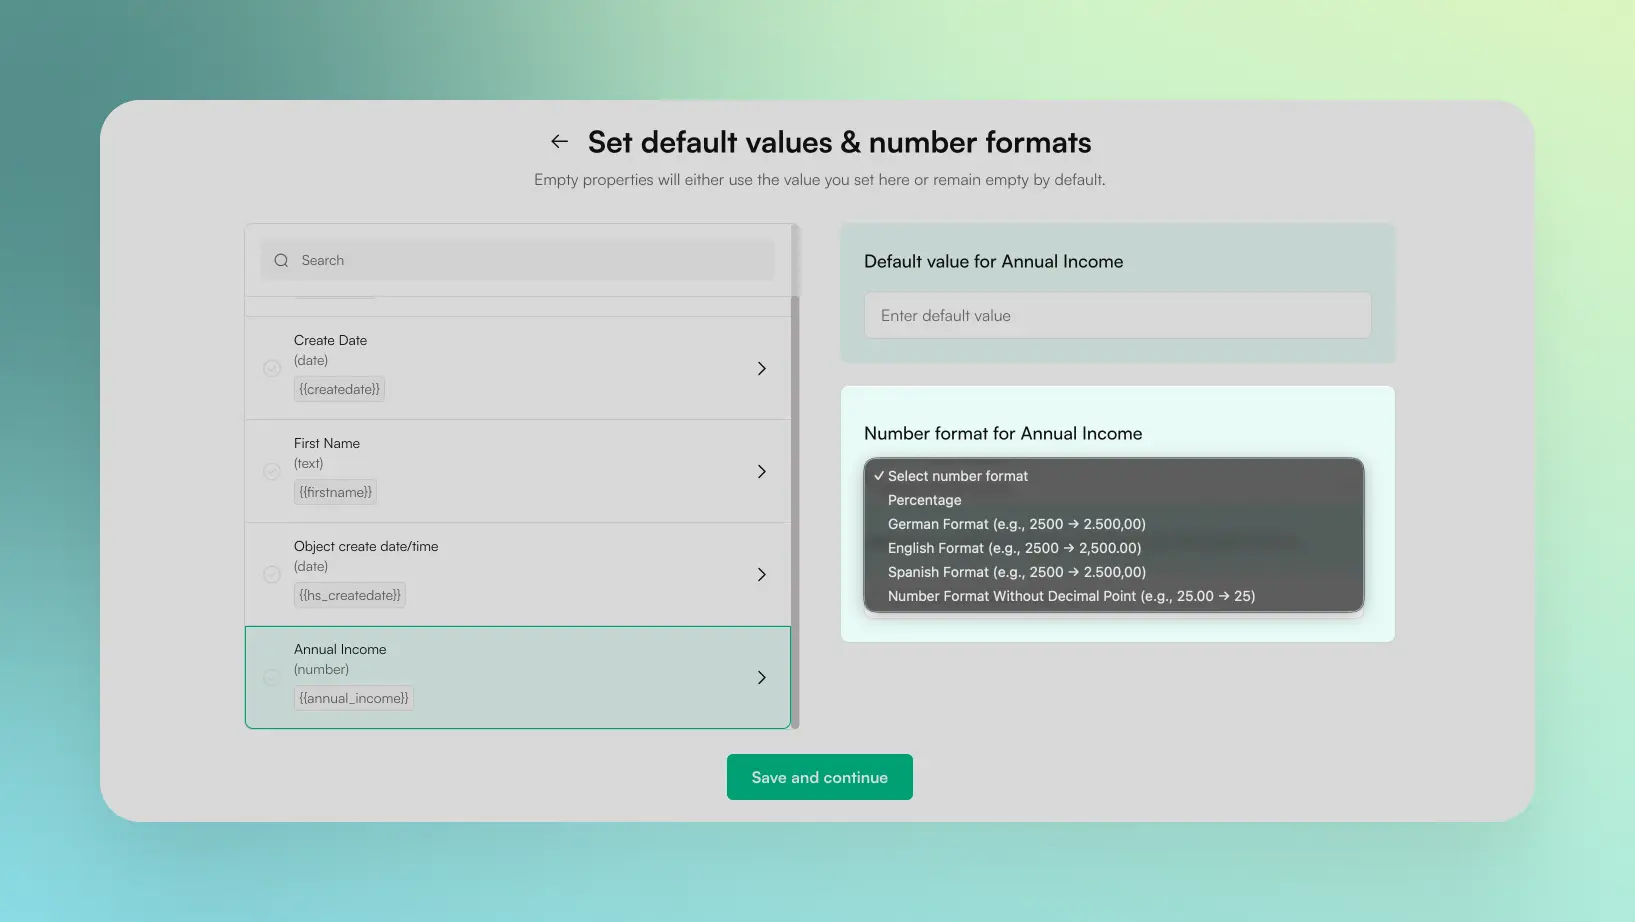
- You can select the format from the dropdown menu to ensure the number displays properly in your generated document.
- Percentage: Choose this format to display values as percentages.
- German format: This format uses commas as the decimal separator and periods for thousands. e.g., 2.500,00 (For 2500.00).
- English format: This format uses commas for thousands and periods for decimals. e.g., 2,500.00 (For 2500.00).
- Spanish format: Similar to the German format, it uses periods for thousands and commas for decimals. e.g., 2.500,00 (For 2500.00).
- Number format without decimal point: This format is used to display numbers without decimal points e.g., 25 (For 25.00).
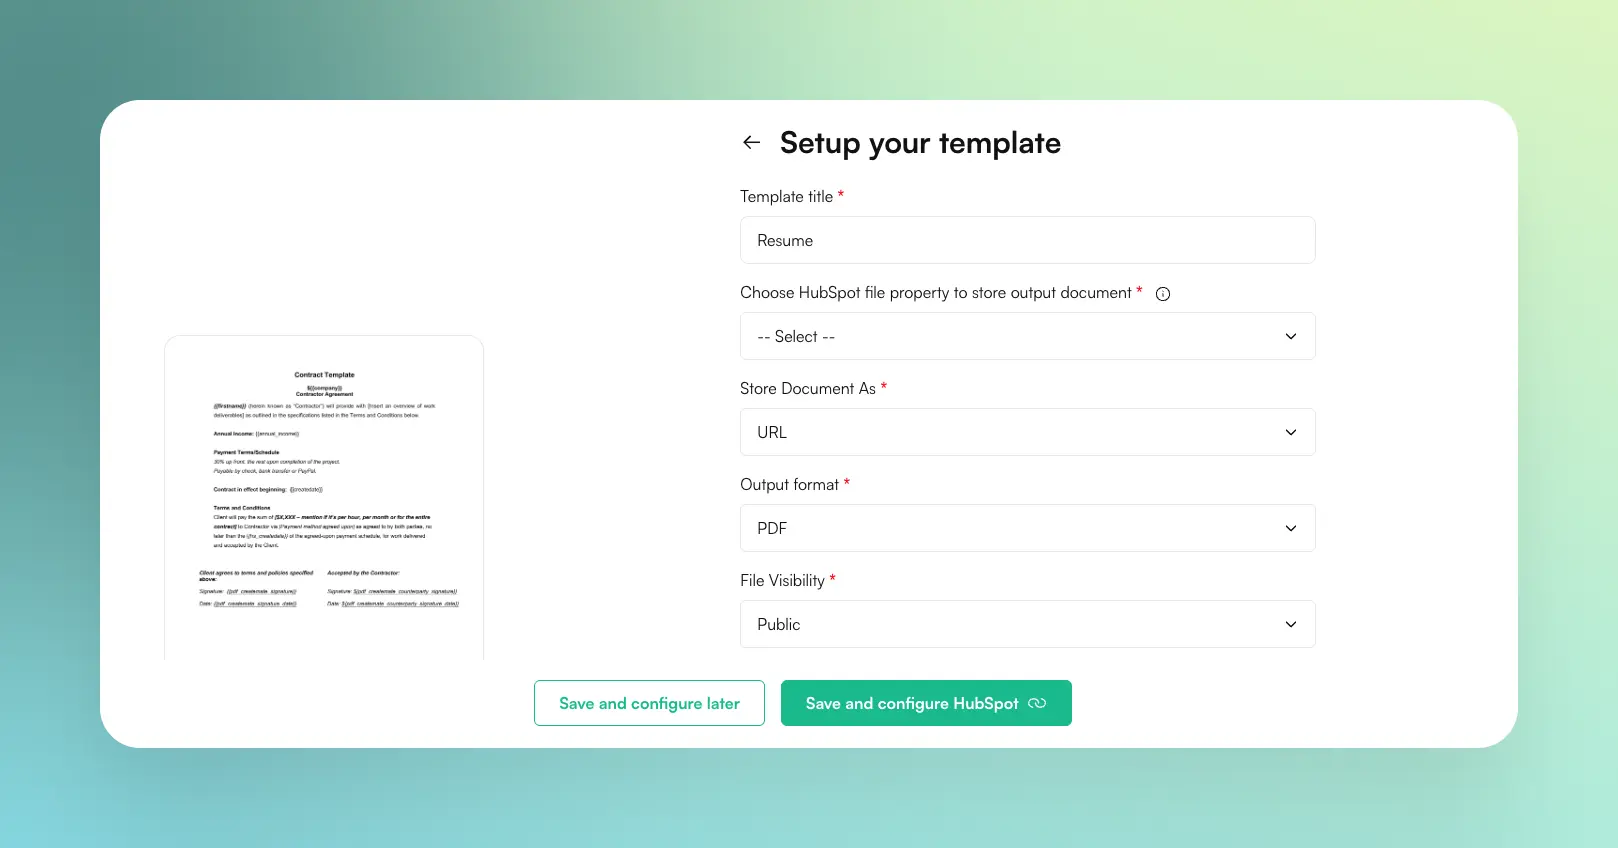
- Choose a HubSpot contact property to store the generated document file. Ensure the property type is 'file'. If the suitable property isn't available, create a new file property for the contact in HubSpot. Subsequently, click 'sync properties' in PDF CreateMate, and then select the newly created property.
- Assign a distinctive and meaningful title to your template for easy identification.
-
Now you can create a dynamic file name based on your preferences. Simply copy the placeholders from the Properties page
or use the default placeholders listed below. Note: If any property does not have a value, it will appear as it is in the file name. For example, if {{objectName}} is empty, the placeholder will remain as {{objectName}} in the file name. The Unique ID will always be appended to the file name at the end.Template title{{templateTitle}}Object name{{objectName}}Conversion date{{conversionDate}}Unique ID{{uuid}}
- Click on 'Save and configure HubSpot.'
- PDF CreateMate will then proceed to set up HubSpot in line with the uploaded template.
- If your HubSpot account supports workflows, PDF CreateMate will automatically generate a workflow. Note: You can later set up triggers and further configure this workflow directly in HubSpot.
Available number formats:
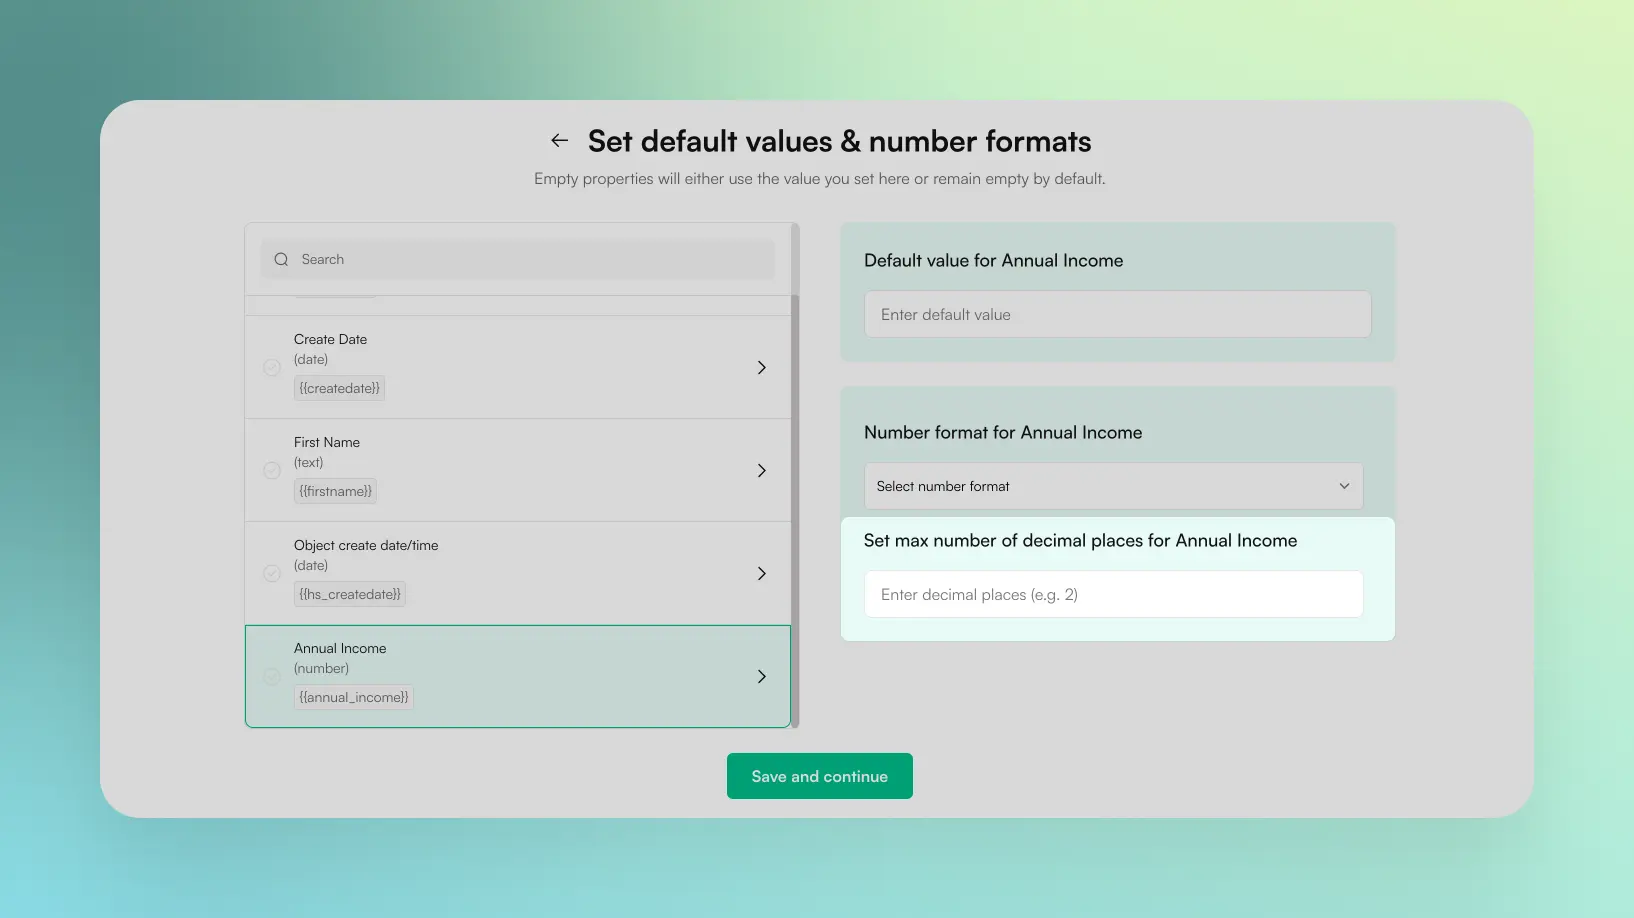
Set max number of decimal places for property:
You can now configure how many decimal points to display for number type properties.
Customize output file name format:
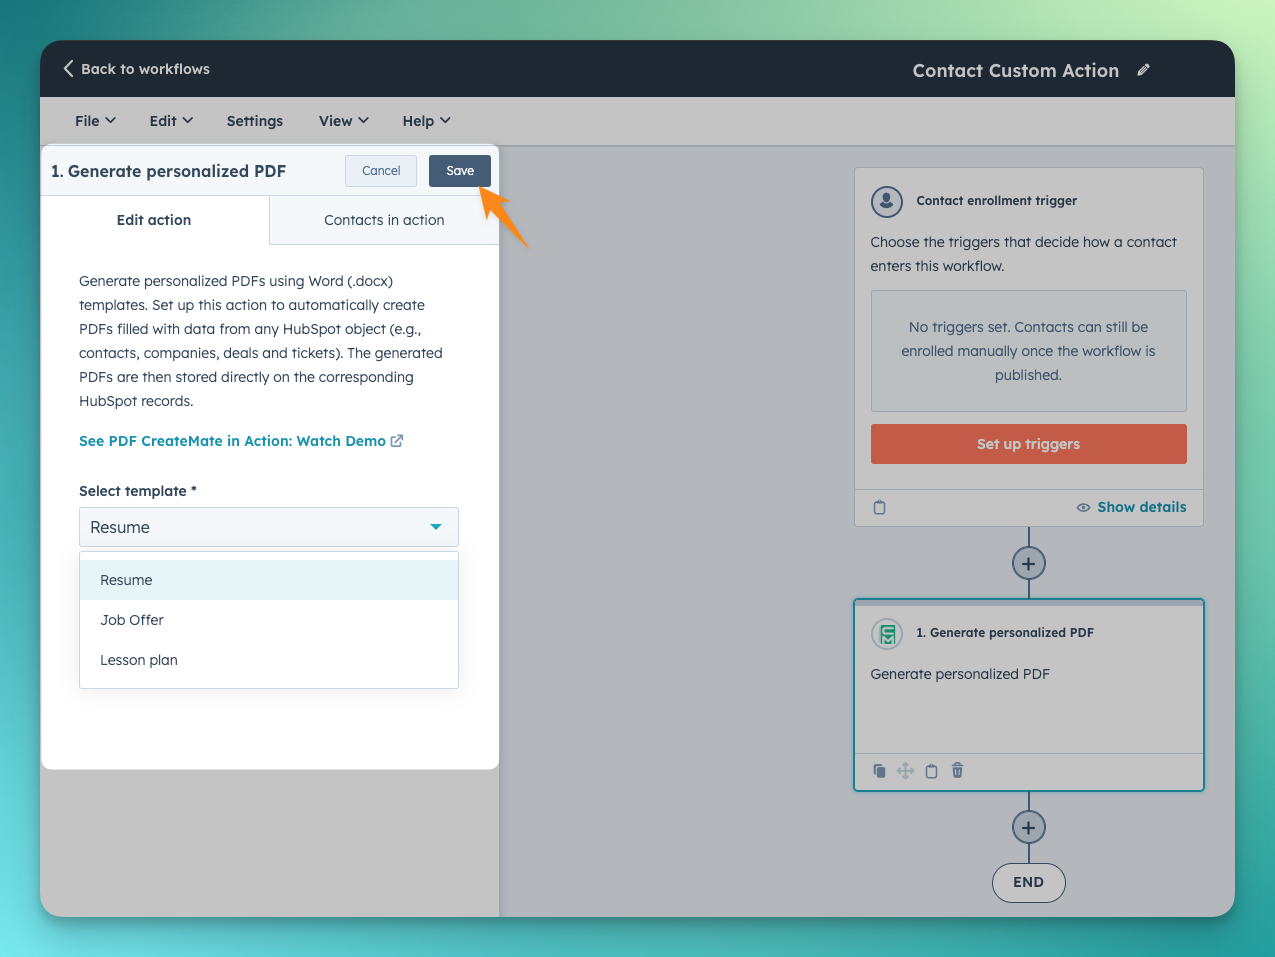
The PDF CreateMate workflow action allows you to automatically generate personalized PDFs based on data from your HubSpot records. Follow the steps below to set up and use this feature effectively:
Prerequisites:
Before getting started, ensure that:
- You have an active HubSpot account configured with PDF CreateMate. Connect HubSpot account if not configured.
- Your Word (.docx) templates have been uploaded and configured on PDF CreateMate for use in the workflow. Upload personalized template if not configured.
Steps to Set Up the Workflow Action:
- Create a Workflow: In HubSpot, create a new workflow for the specific HubSpot standard object (e.g., contacts, companies, deals, tickets) and custom objects that you want to generate PDFs for.
- Set the Trigger: Configure the desired trigger that will initiate the PDF generation process. This can be based on any event or condition in HubSpot, such as form submissions or deal stages.
- Add the PDF CreateMate Action: Once the trigger is set, click on Add actions in the workflow editor and search for 'PDF CreateMate'.
- Select 'Generate Personalized PDF': From the list of actions, choose Generate personalized PDF to add this to your workflow.
- Choose a Template: Select the Word (.docx) template that you want to use for generating the PDF. The data from the HubSpot record will be automatically filled into the template.
- Save the Workflow: After configuring the PDF action, hit Save to finalize the setup.
- Test Before Publishing: It is important to test the workflow to ensure everything is functioning as expected before you publish it.
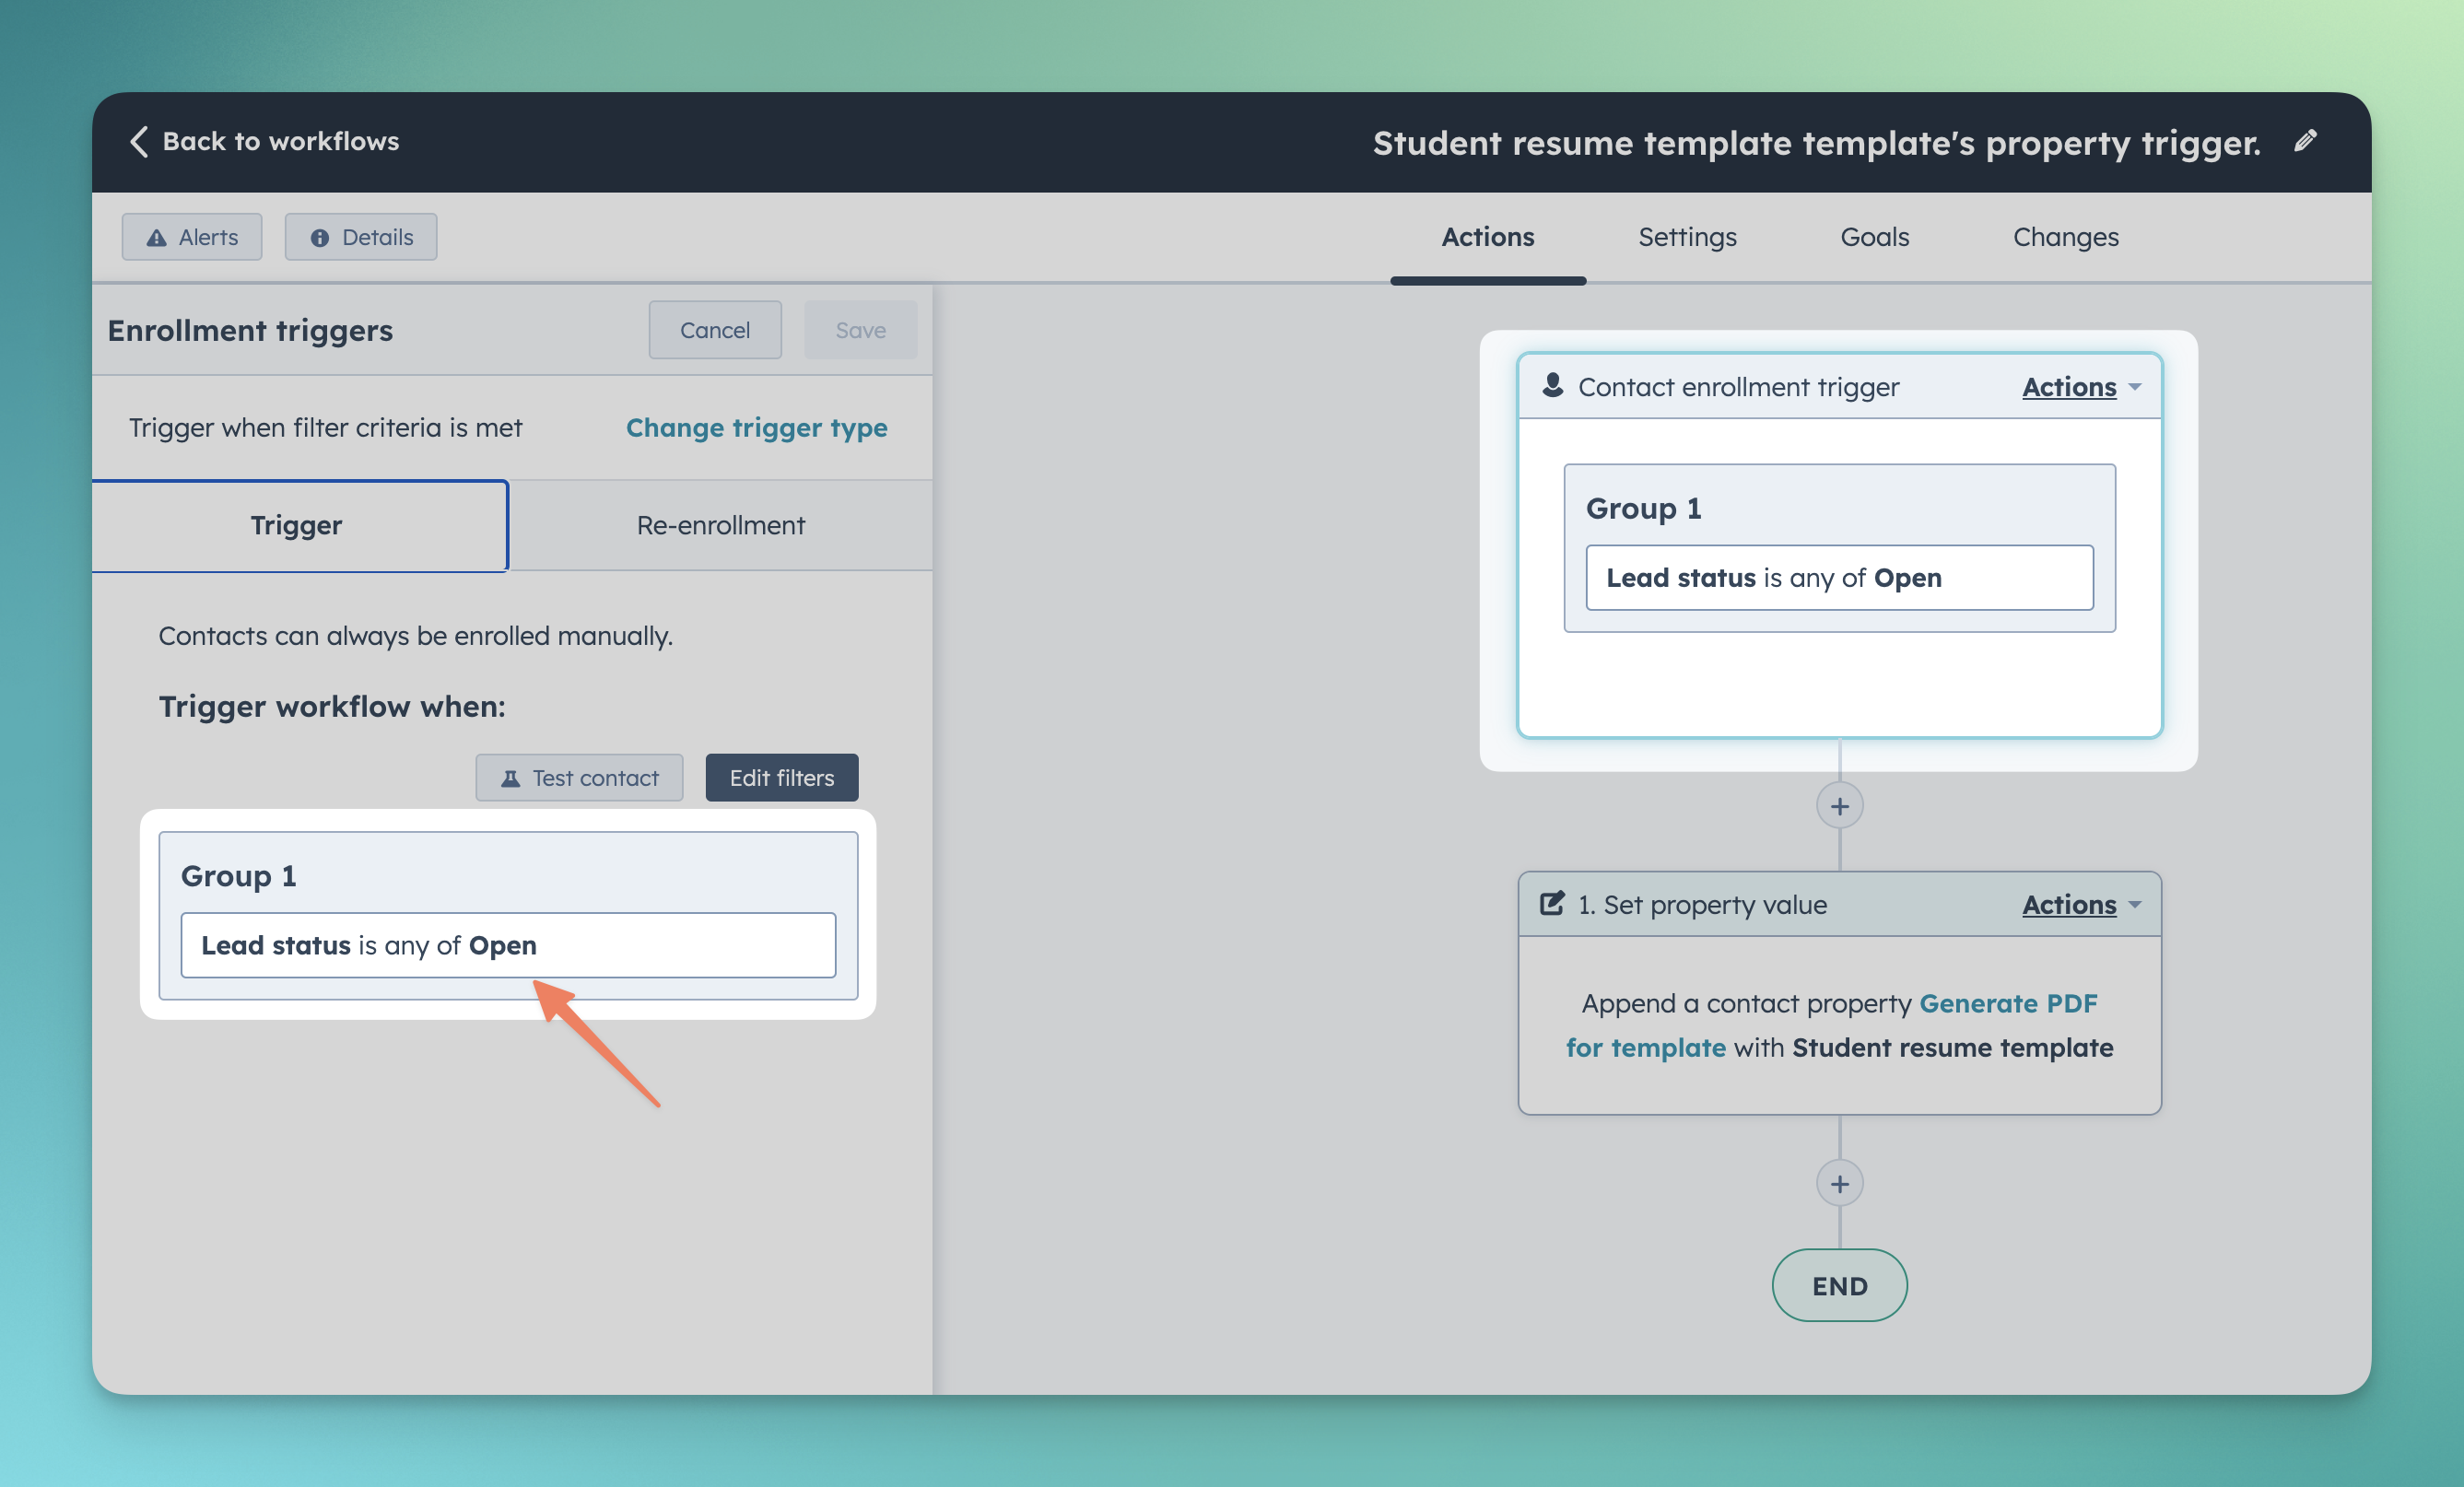
- Navigate to the created workflow and start by clicking on 'Contact Enrollment Trigger.'
- Choose the appropriate triggers based on your requirements.
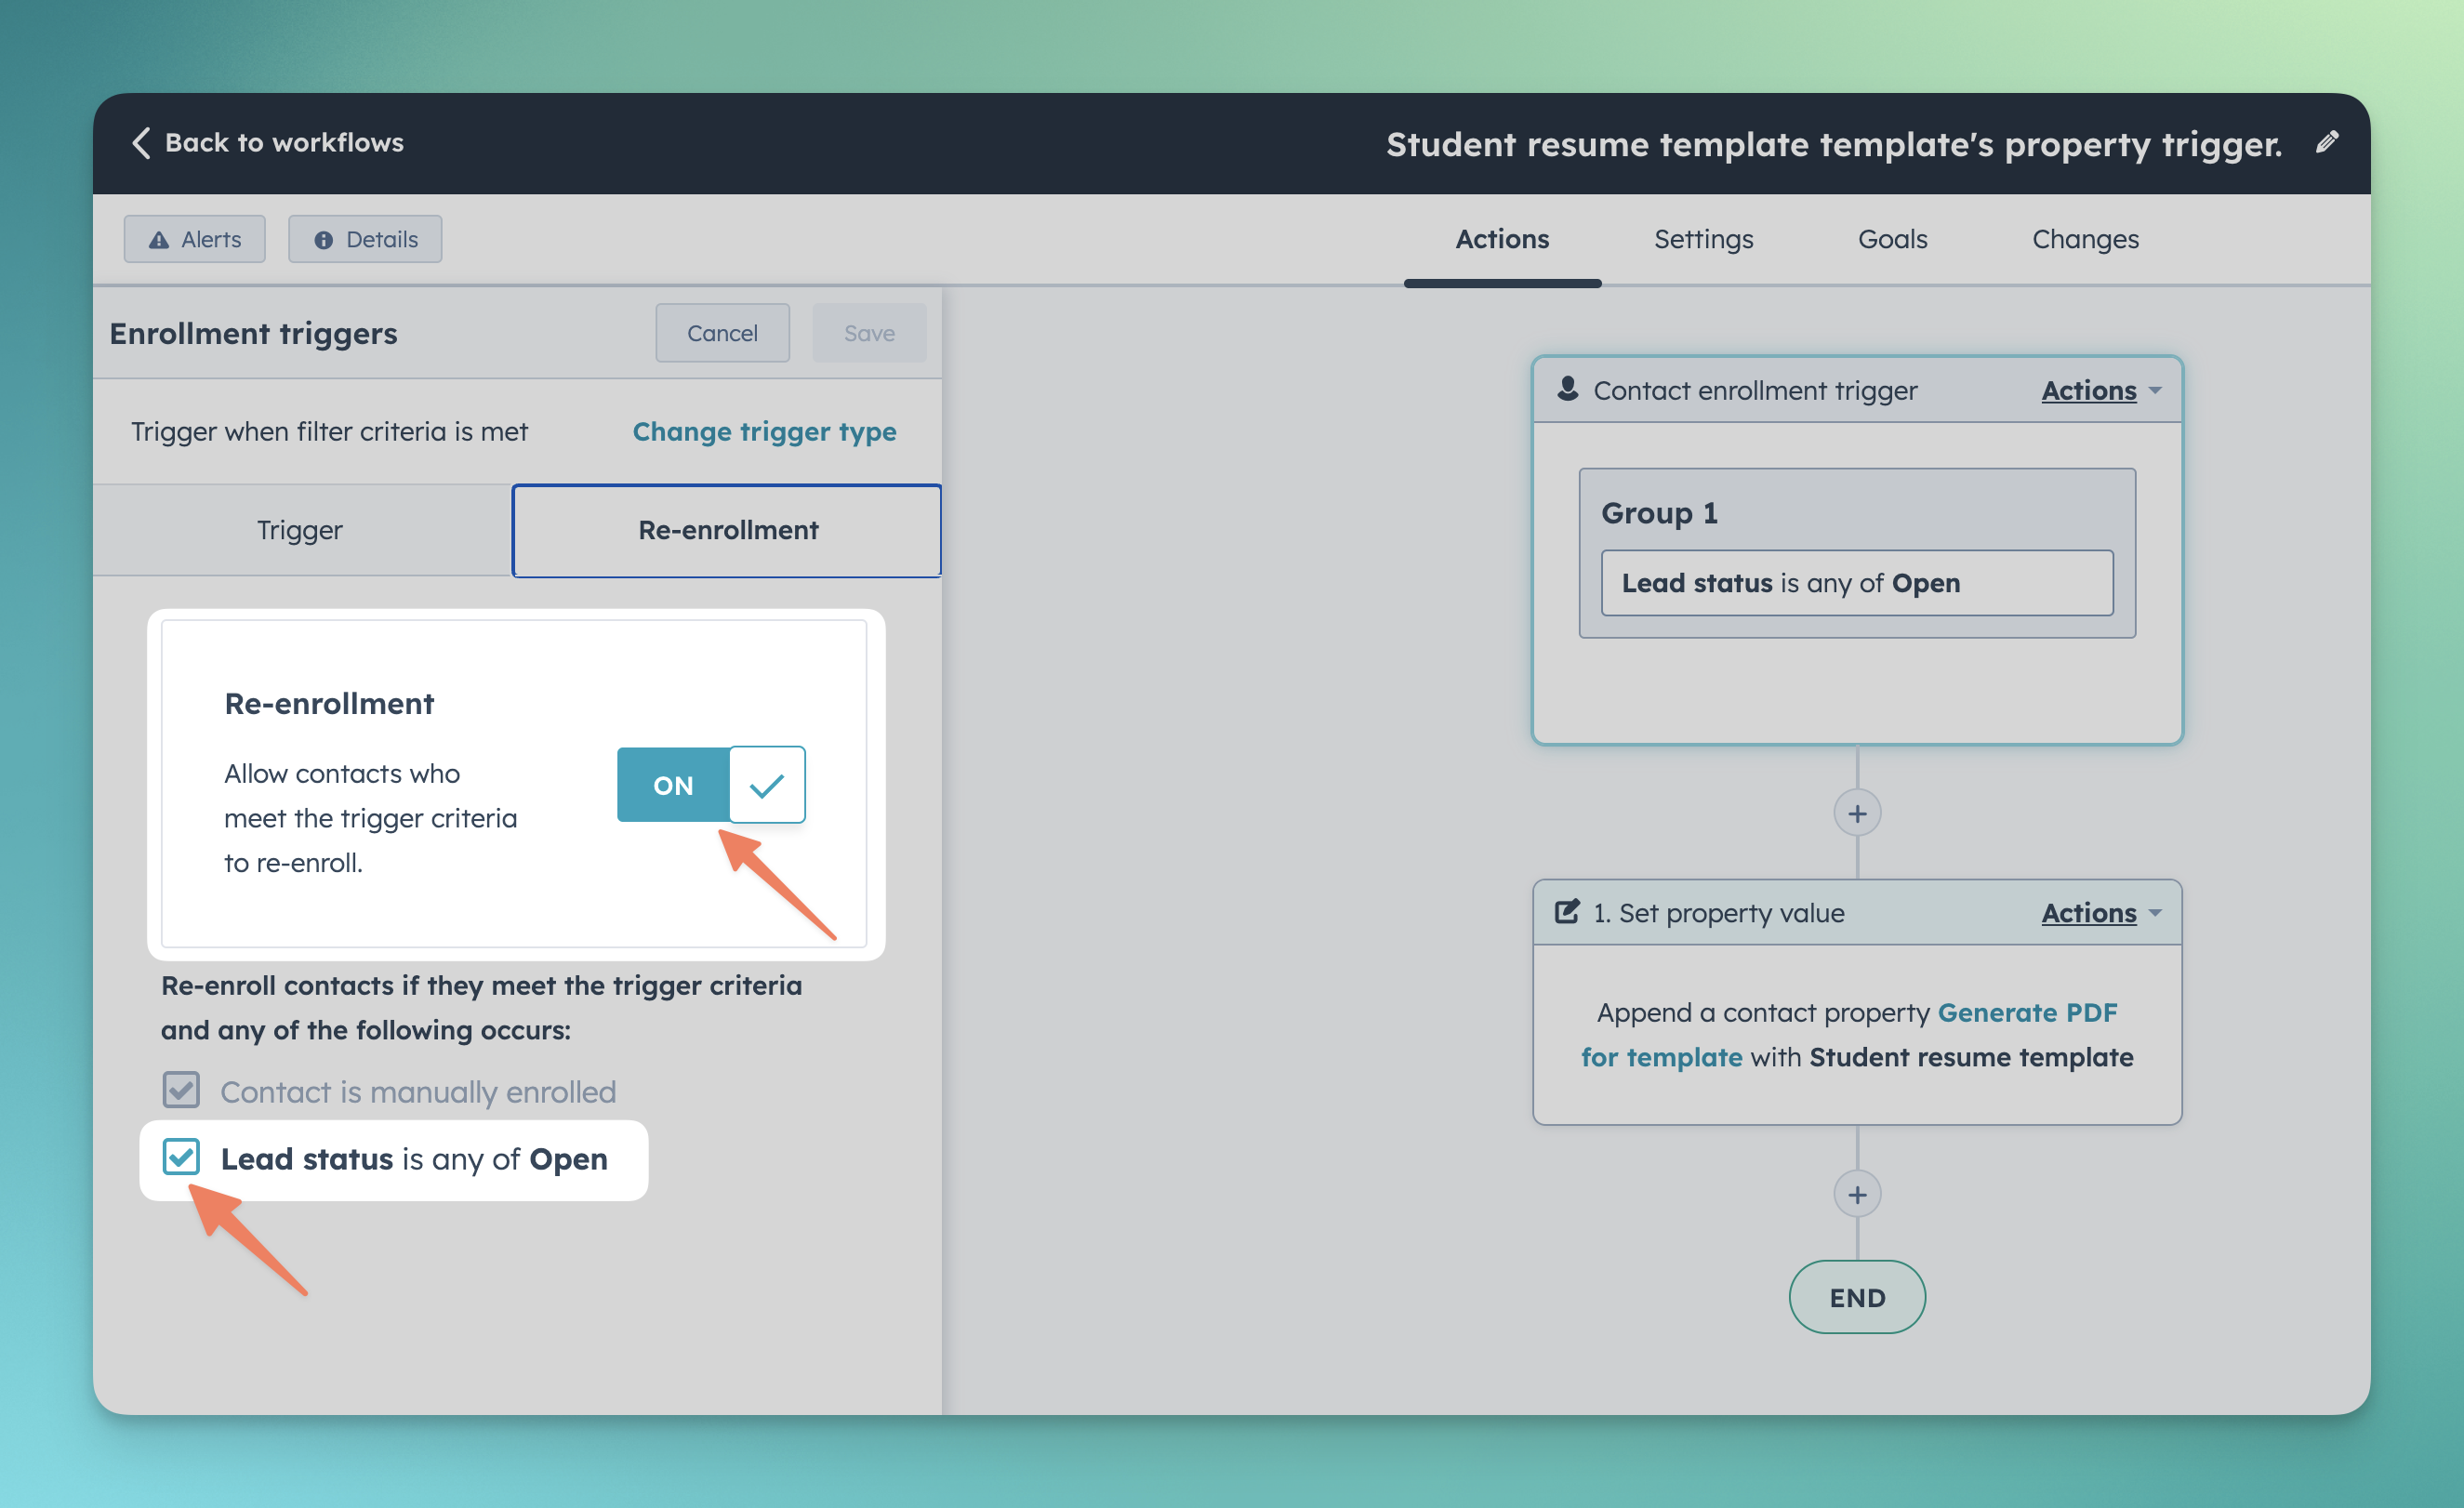
- Optionally, activate the re-enrollment toggle if you want the workflow to be re-triggered when the criteria are met again.
- Once done configuring, ensure you save and turn on the workflow within HubSpot.
- For testing purposes:
- Open any contact on your HubSpot account.
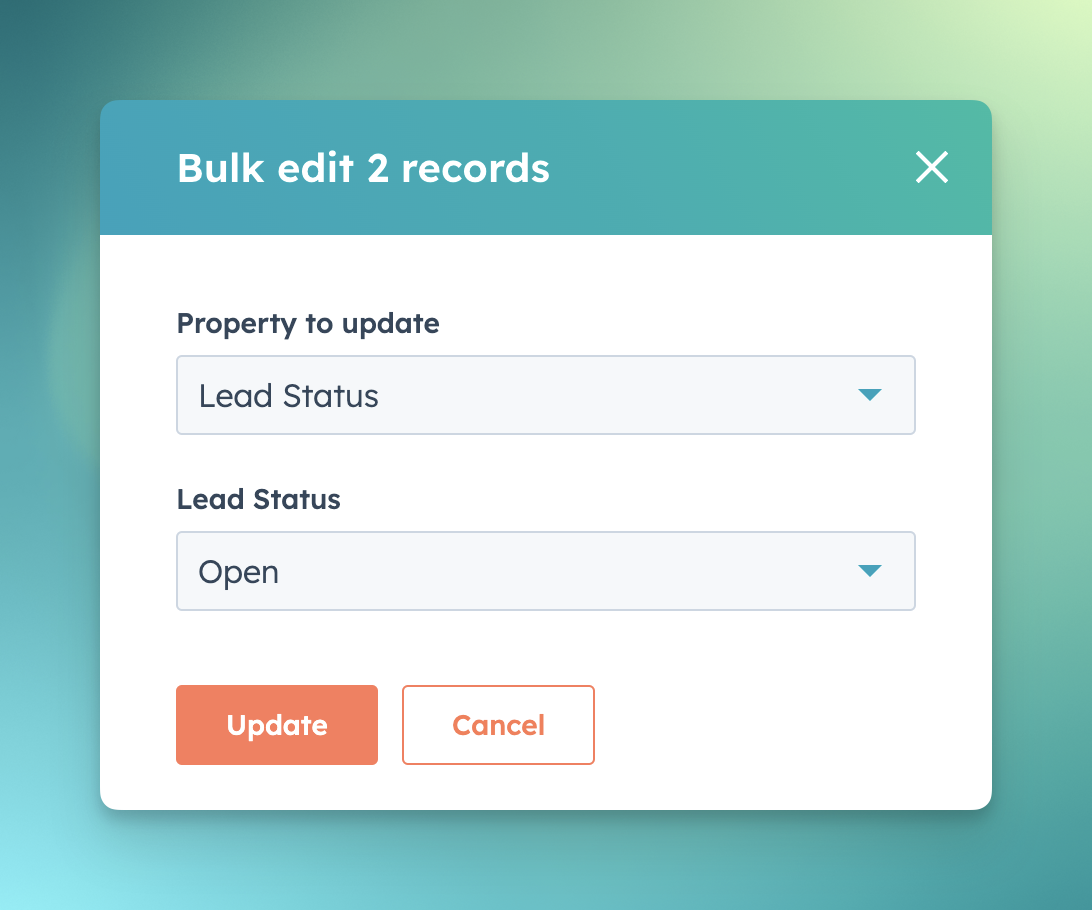
- Set the value of the trigger properties that you've selected during workflow configuration.
- This action will activate the workflow, prompting PDF CreateMate to process and generate a document for the involved contact.
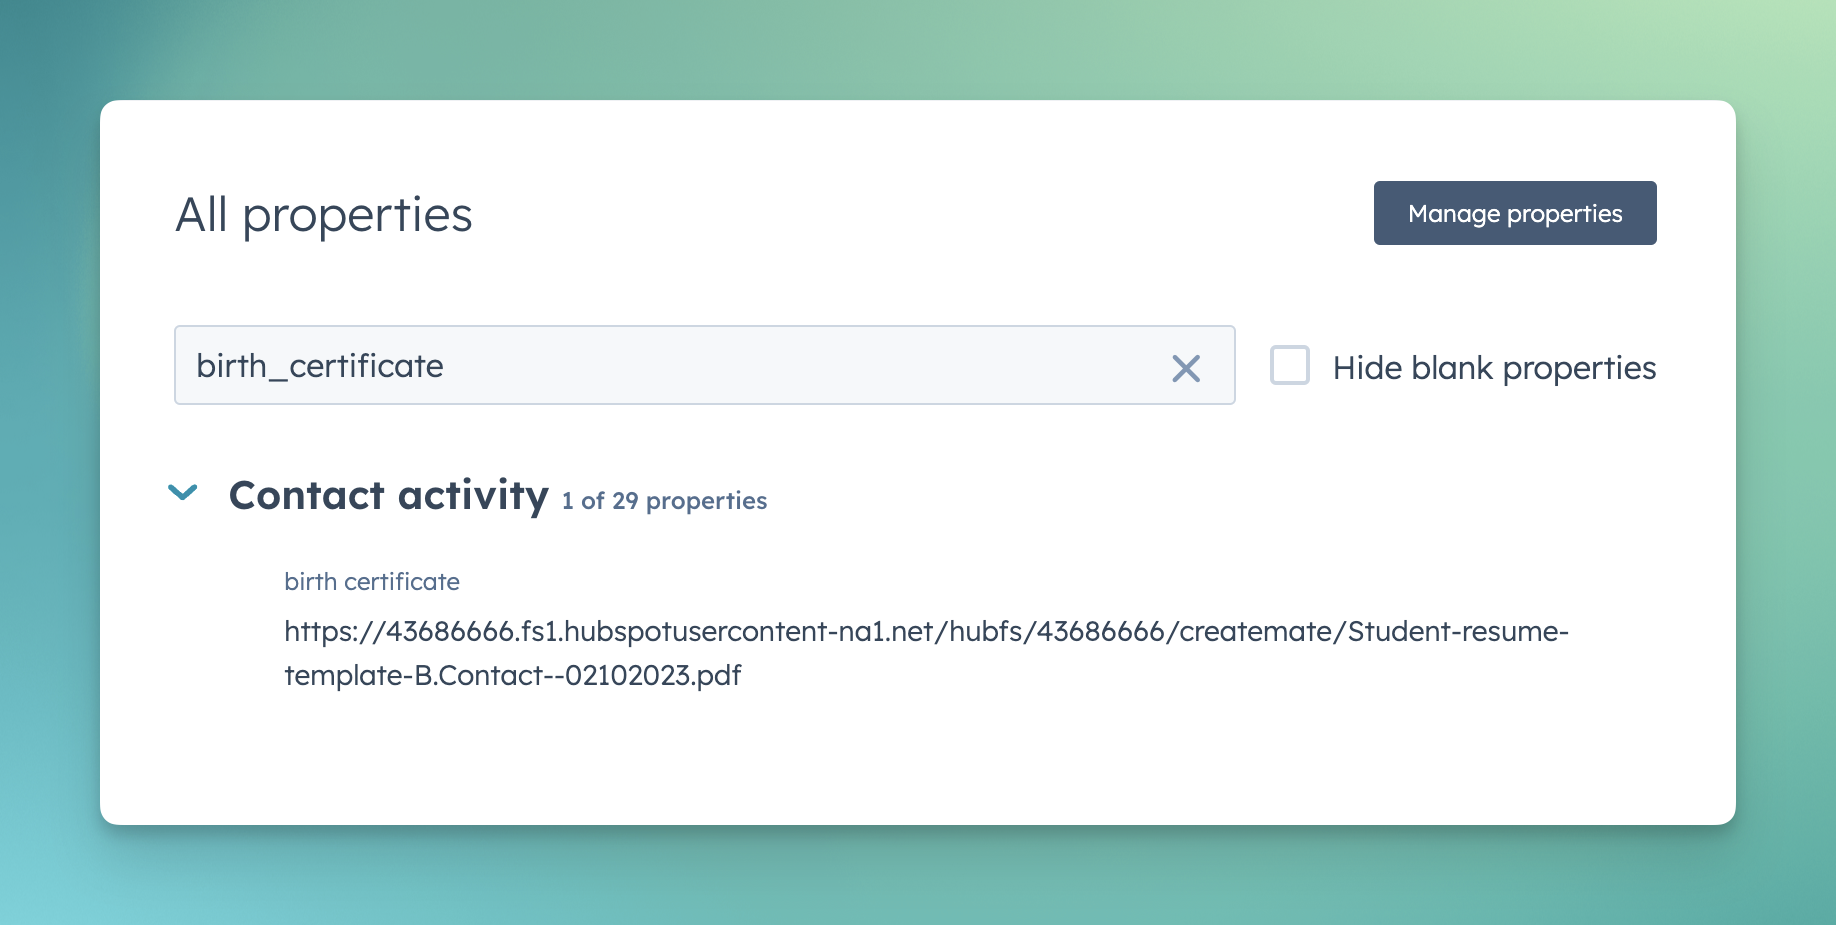
- To view the generated document, open the contact and search for the file property you designated during the upload phase.
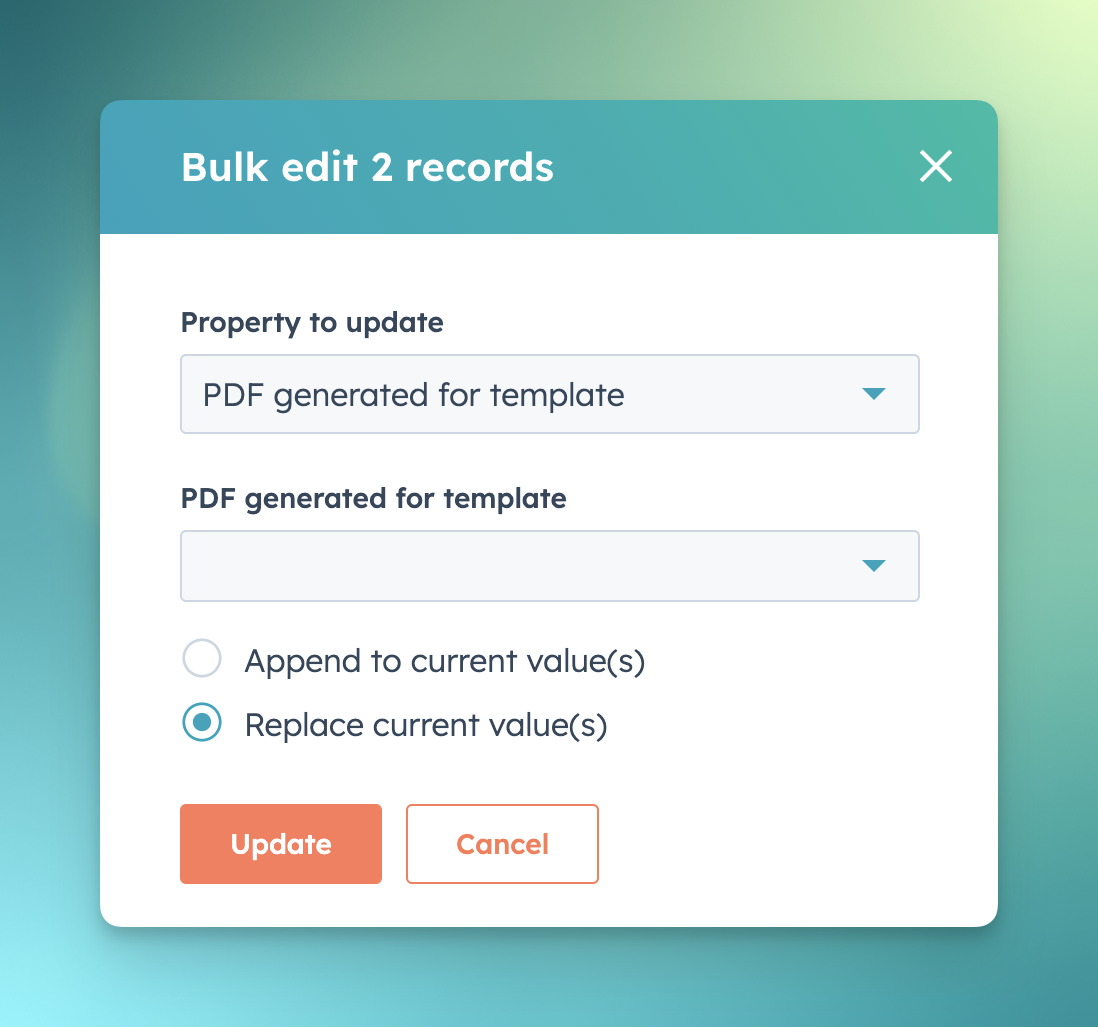
- Navigate to your entire contact list or a specific filtered contact list.
- Select the contact(s) for whom you wish to manually generate a document.
- Click on the 'Edit' option.
- In the search bar, input 'Generate PDF for Template' to locate the property.
- Browse through the value options to search for and select the desired template.
- Confirm by clicking 'Update.'
- PDF CreateMate will then initiate the process to produce a document for the selected contact(s) based on the templates you've chosen.
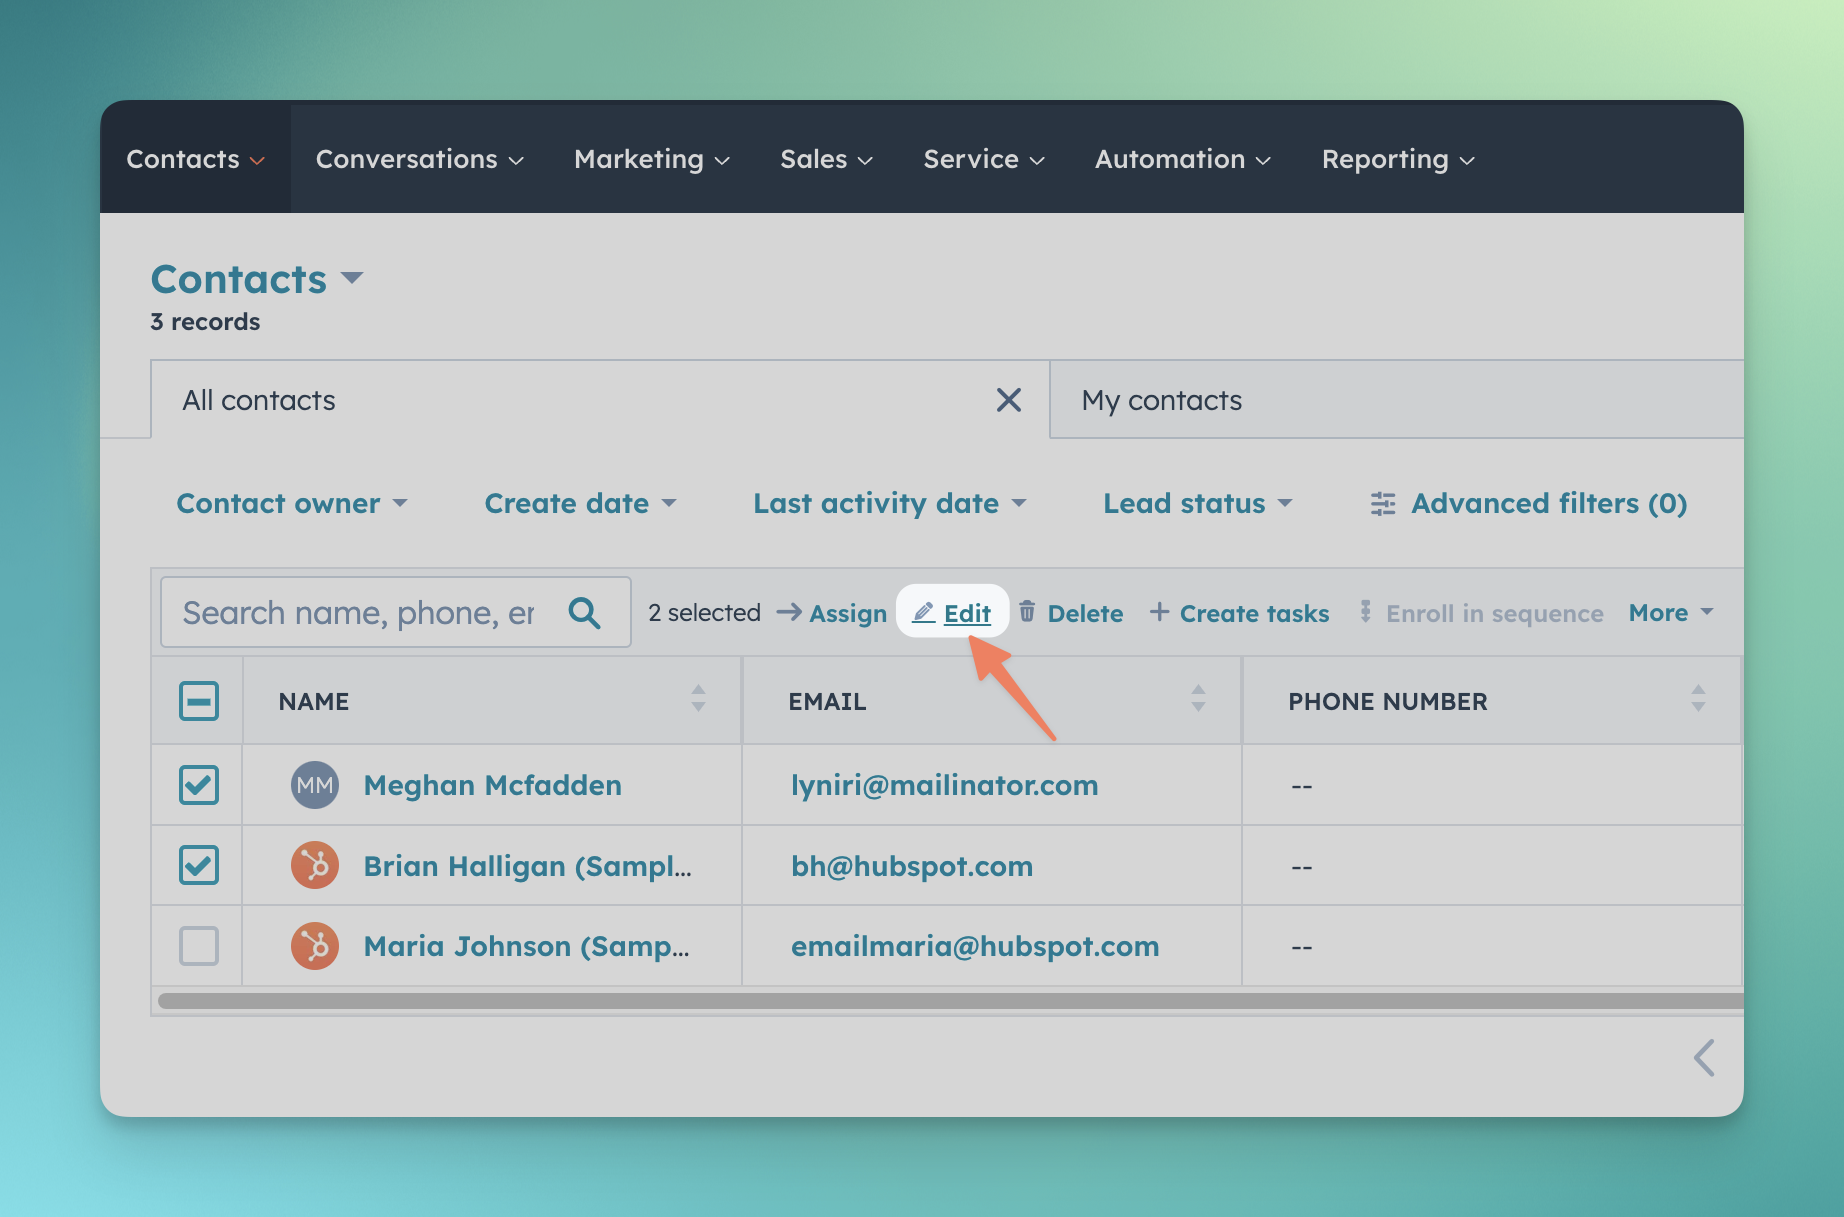
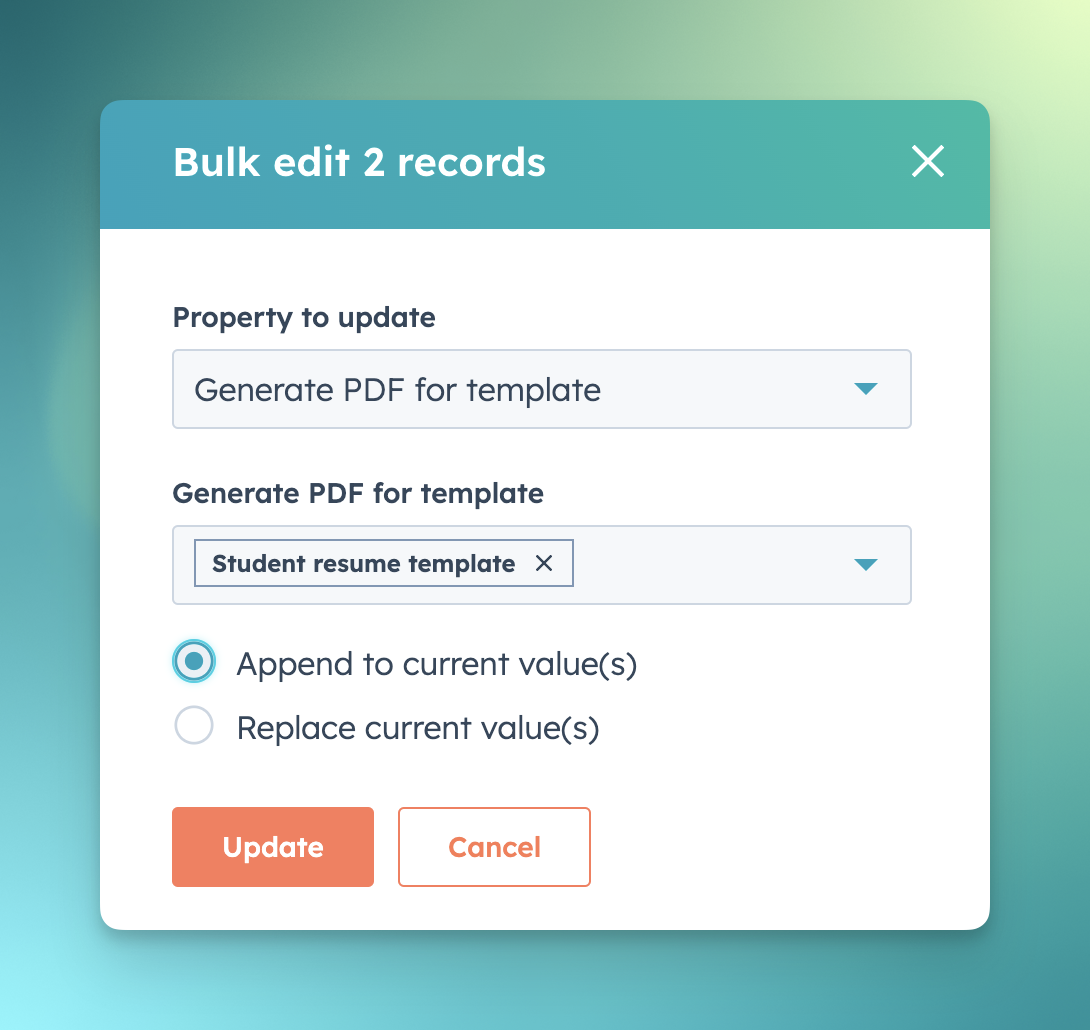
- Begin by navigating to your contact list for PDF CreateMate template.
- Choose the contact(s) for whom you wish to regenerate a documents.
- Click on the 'Retry/Regenerate documents' option.
- Upon completion of these steps, PDF CreateMate will activate the process to regenerate a document for the selected contact(s) for the selected templates.
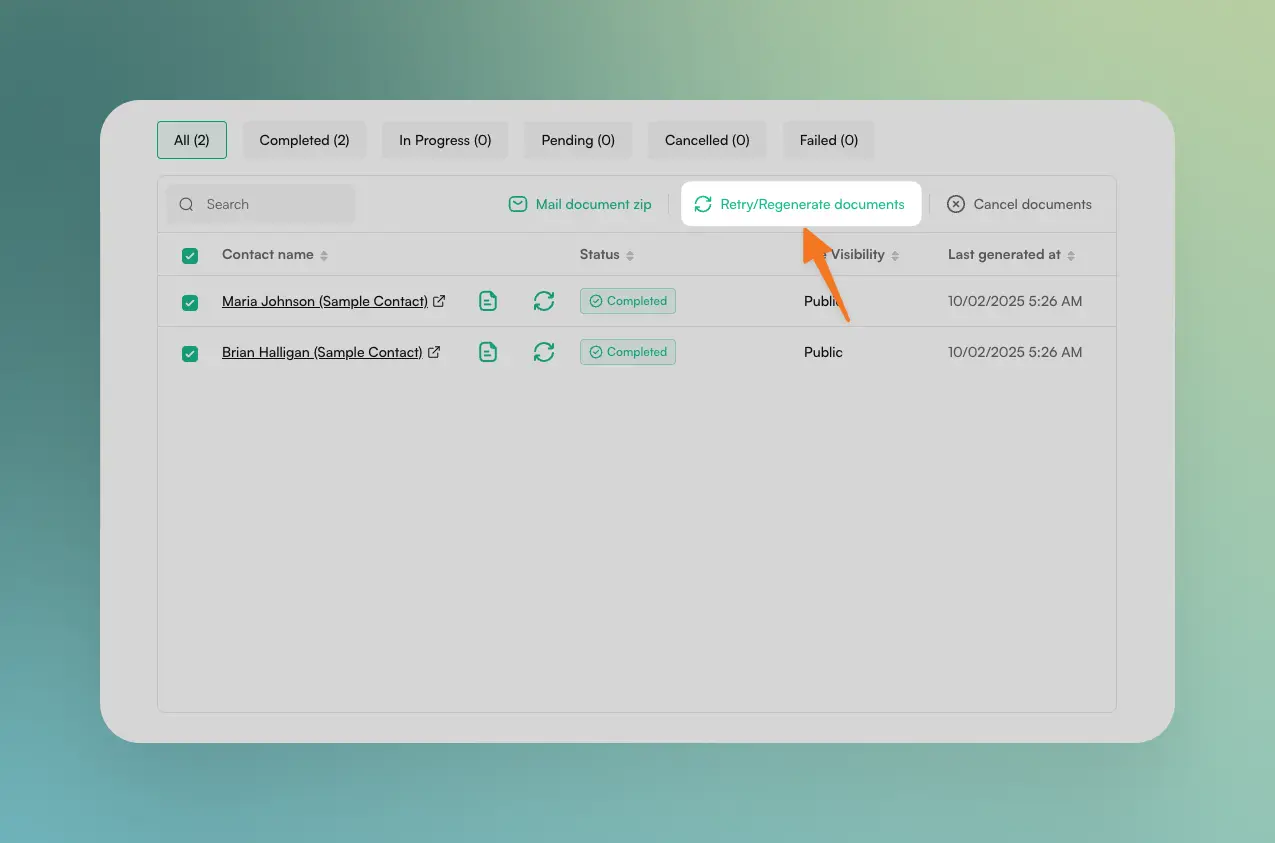
- Begin by navigating to your full contact list or a specific filtered contact list.
- Choose the contact(s) for whom you wish to regenerate a documents.
- Click on the 'Edit' option.
- Look up the property titled 'Generate PDF for Template' and remove the template from the value options.
- Search for the property named 'PDF generated for Template' and similarly remove the template from its value options.
- Confirm these changes by clicking 'Update'.
- Once more, click on 'Edit'
- Look up the property 'Generate PDF for Template'.
- Browse through the value options to search for and select the desired template.
- Confirm by clicking 'Update'.
- Upon completion of these steps, PDF CreateMate will activate the process to regenerate a document for the selected contact(s) based on the templates you've picked.

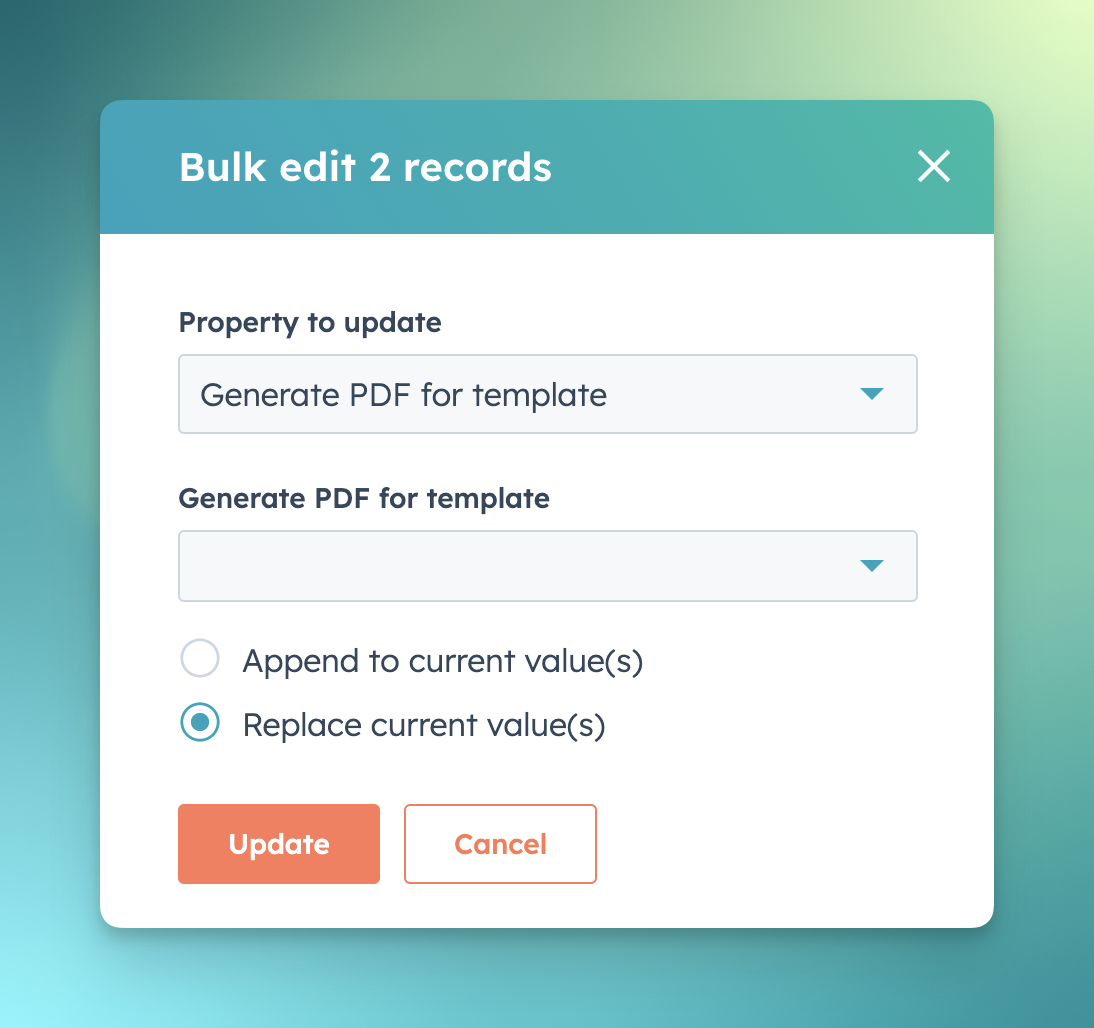

PDF CreateMate now lets users create signable templates, making it easy to add signatures to generated documents. This feature is especially useful for contracts, agreements, and other documents that require client signatures.
Making a Template Signable:
-
Create personalized template: Follow the steps in Create personalized template to create your template.
-
To add a signer's signature, include the "Signature" property in your template. To display the signature date as well, add the "Signature Date" property. Signature{{pdf_createmate_signature}}Signature date{{pdf_createmate_signature_date}}
-
To add the counterparty's signature, include the "Counterparty Signature" property in your template. To also display the signature date, add the "Counterparty Signature Date" property. Counterparty signature{{pdf_createmate_counterparty_signature}}Counterparty signature date{{pdf_createmate_counterparty_signature_date}}
-
To add a signer's signature, include the "Signature" property in your template. To display the signature date as well, add the "Signature Date" property.
- Upload personalized template: Follow the steps in Uploading personalized template.
-
Enable signature option:
- When uploading, check the box labeled 'Make this template signable.'
- Set a property to store the signature URL, allowing guests who don't have the PDF CreateMate account to sign the document.
- (Optional) You can enable the Add counterparty signature feature, which allows two signatures on a single template.
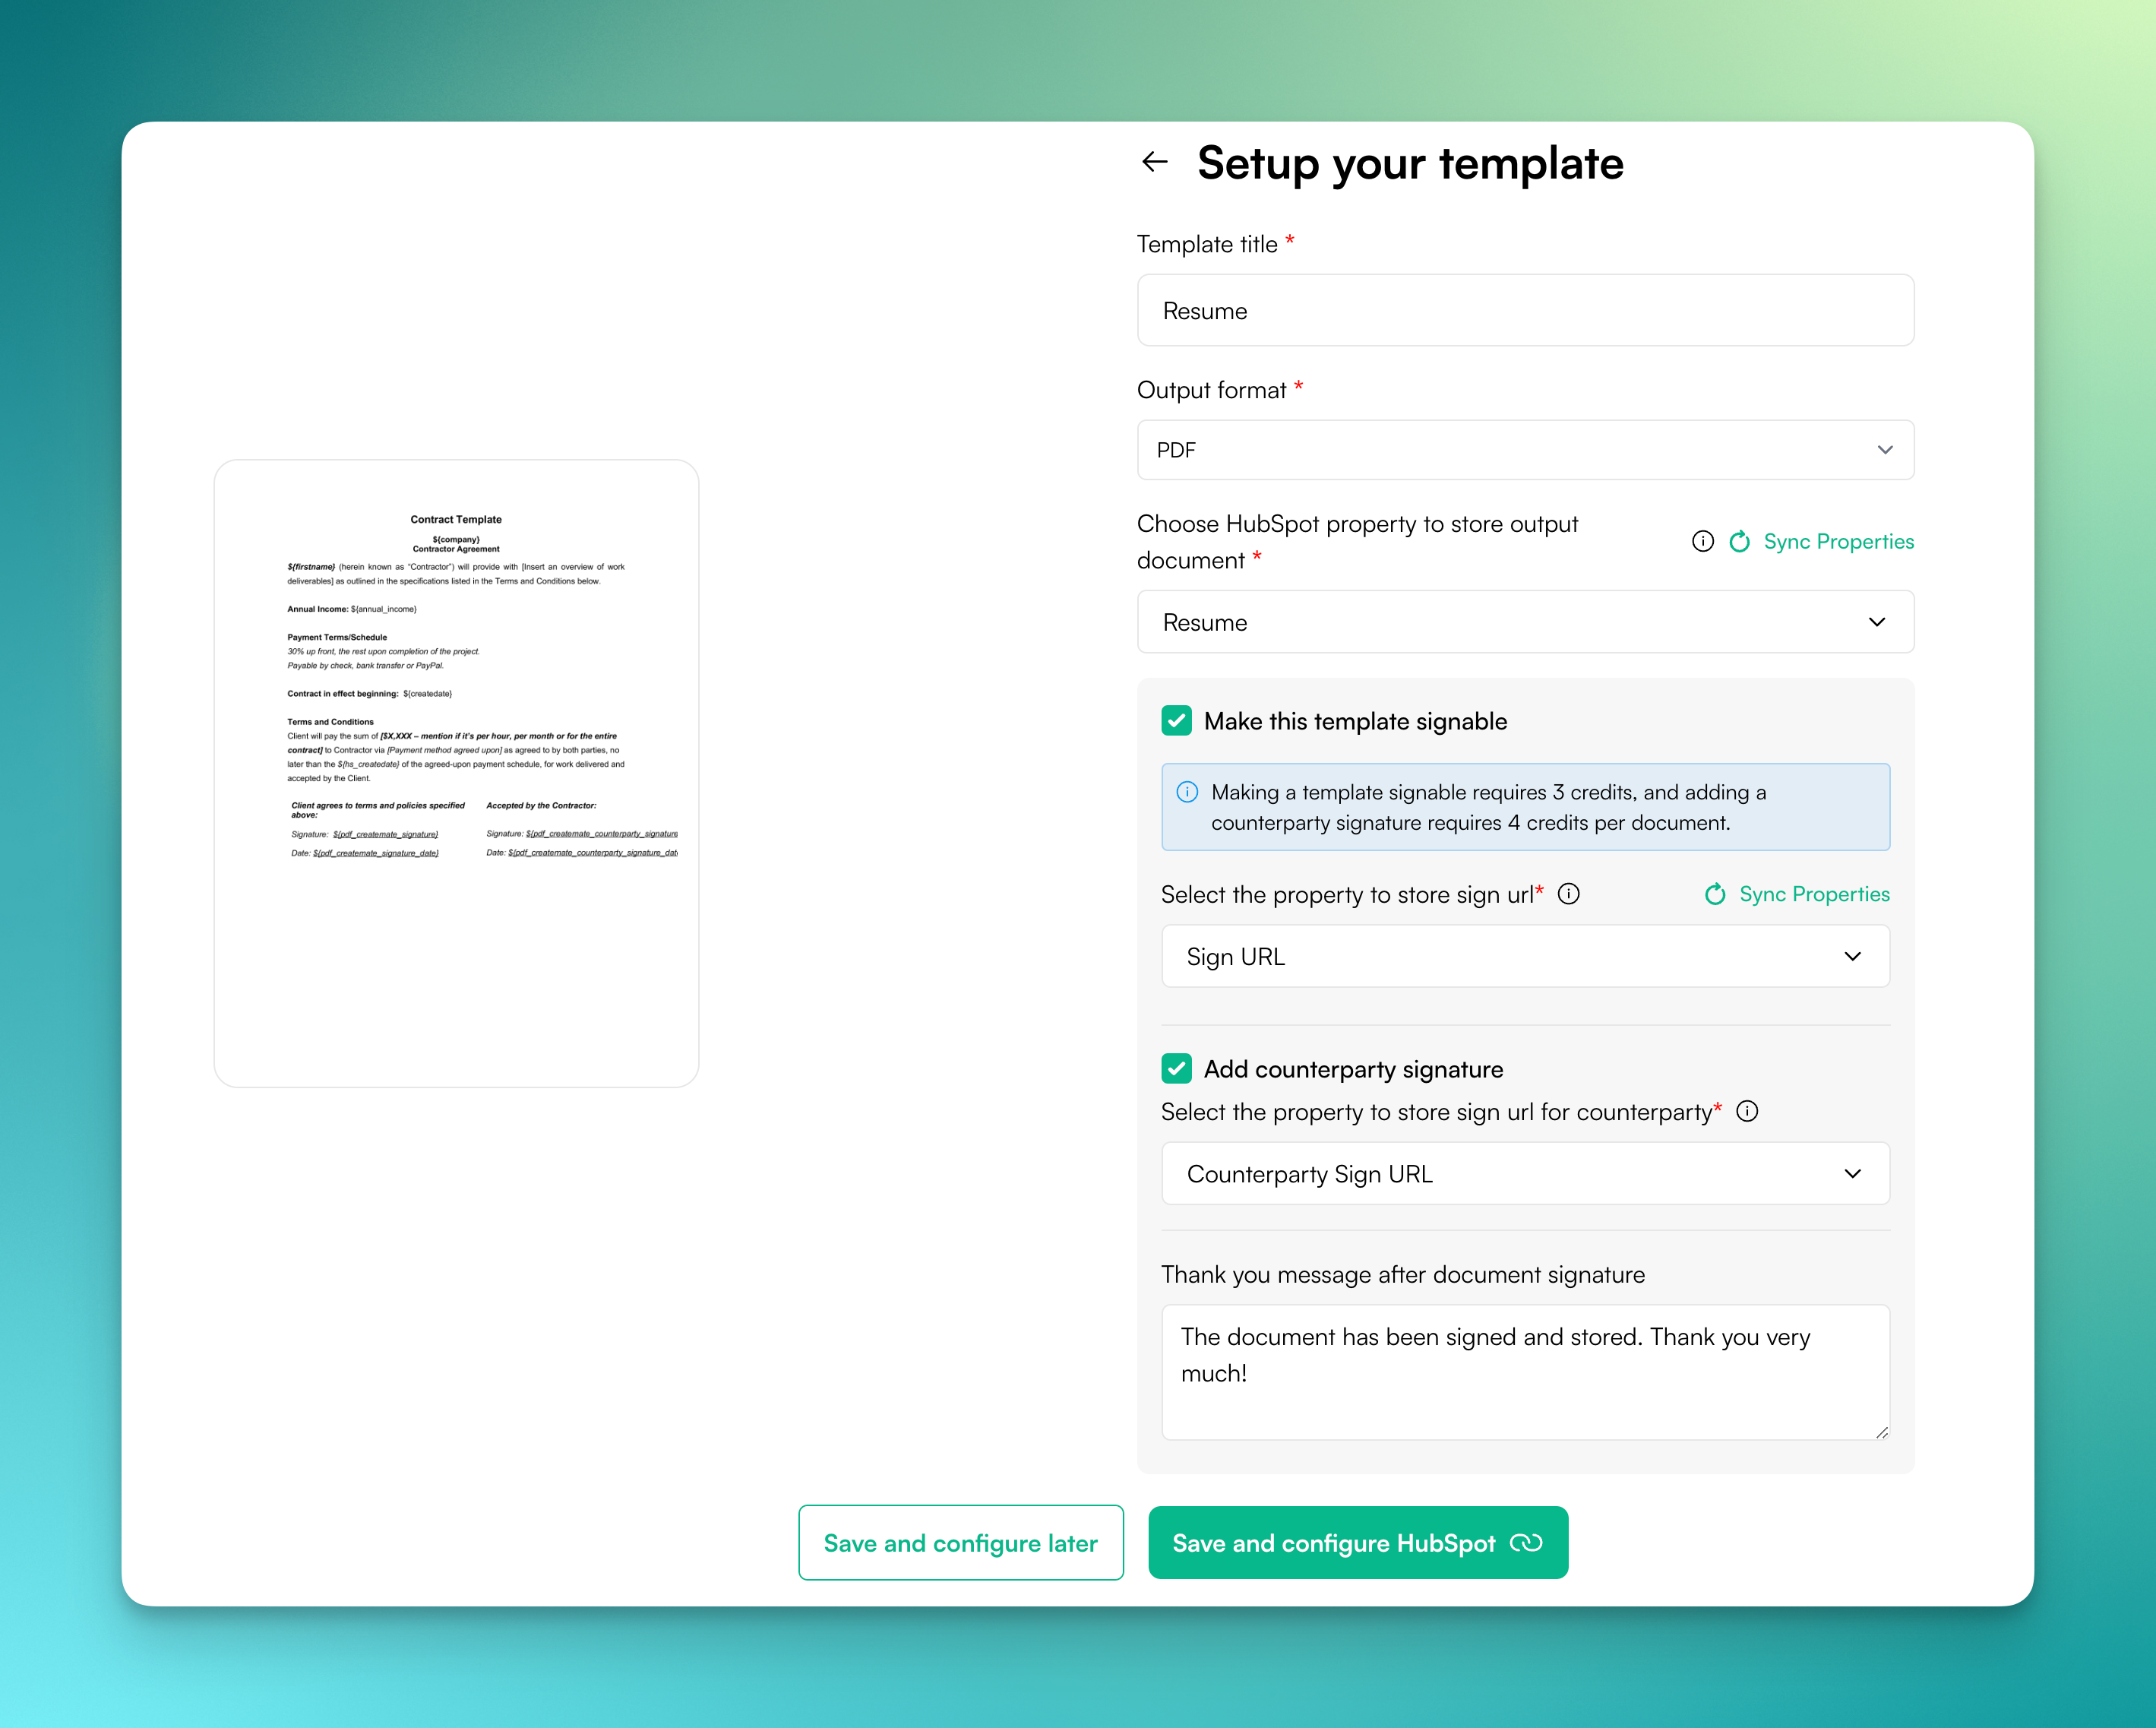
- Personalized Thank You Message: You can customize the thank-you message displayed after the document is signed.
- Credits for signing: Each signable document deducts 3 credits from your account and adding a counterparty signature requires 4 credits.
- When you generate a dynamic document, a signature-related task with the sign URL will be created in HubSpot.
For guidance on setting up emails using HubSpot properties, refer to our HubSpot Property Emailing guide.
-
Begin by navigating to the Template Detail screen for your enrolled objects. Here, you will see a Sign and Sign (Counterparty) buttons for each template that requires a signature.

-
Click on any button to open the signature page.
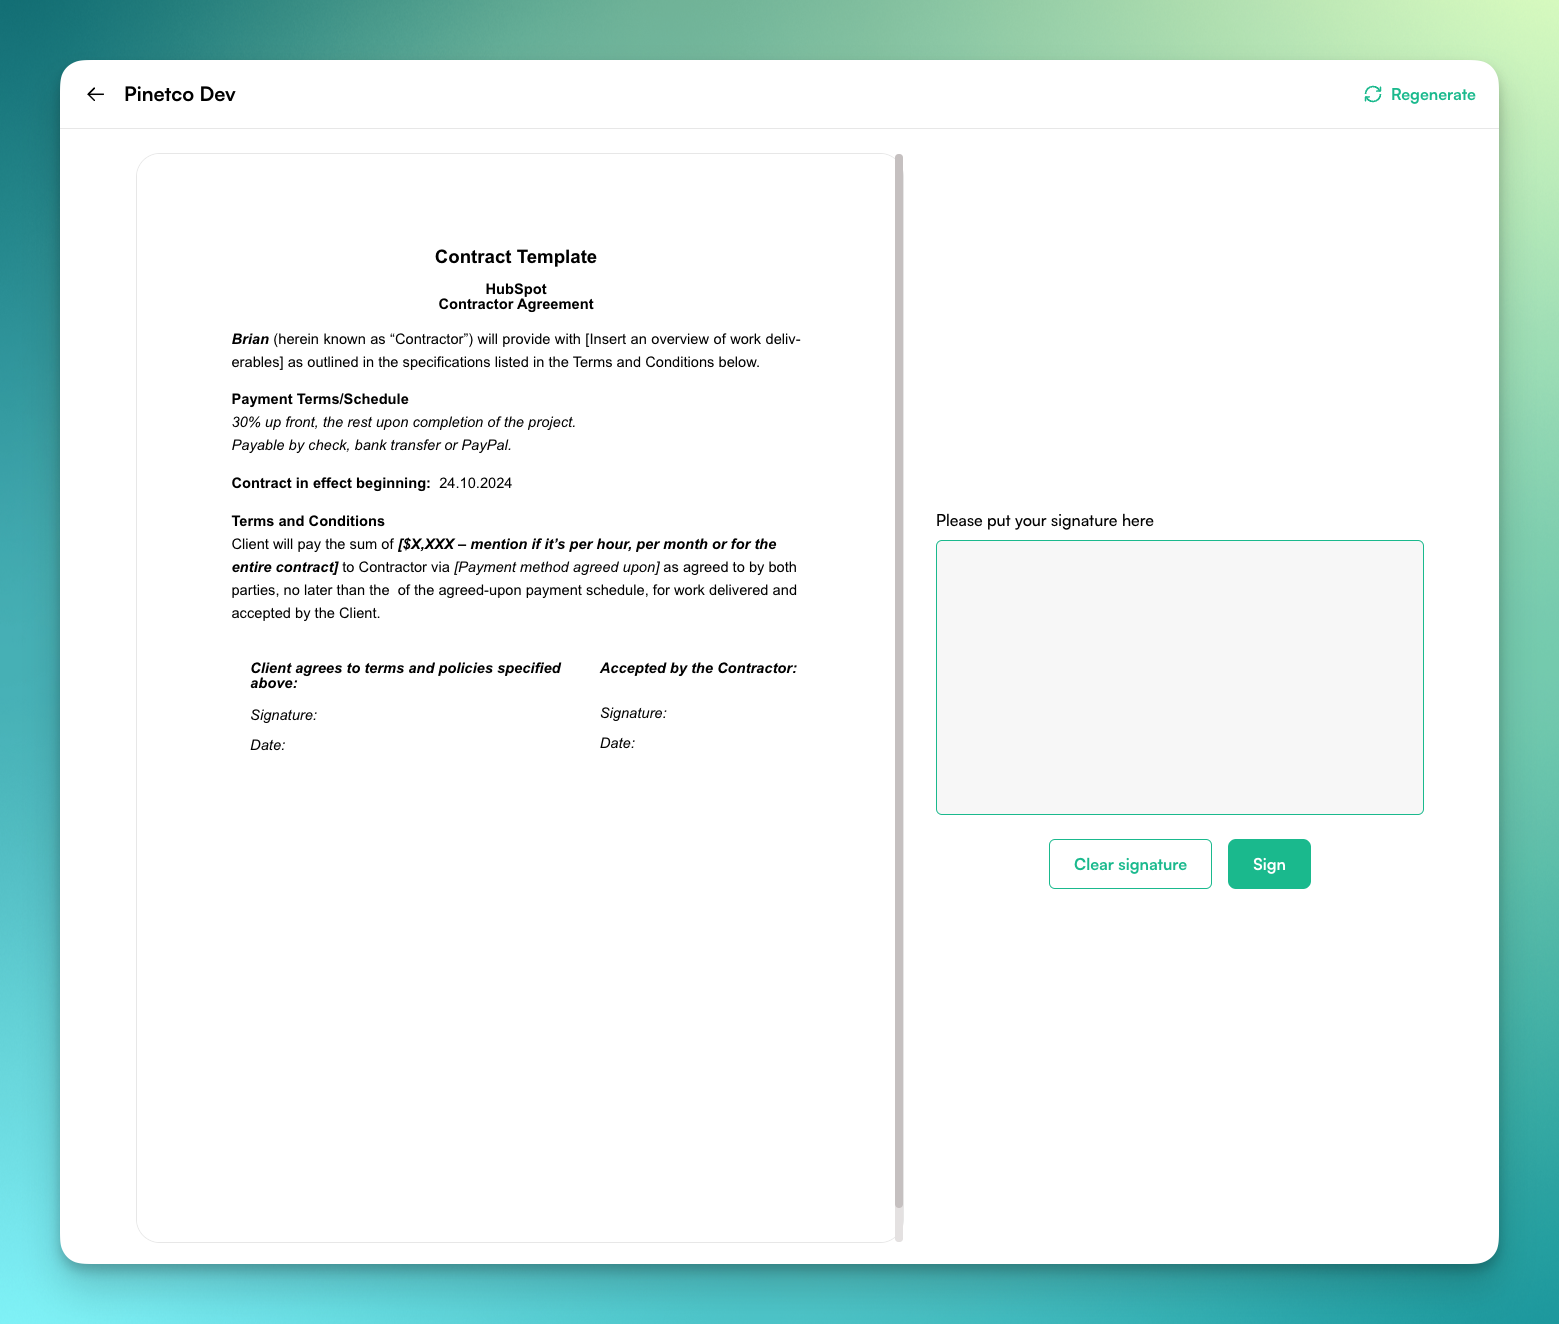
- In the signature box, write your signature. If needed, you can clear your signature using the Clear Signature button.
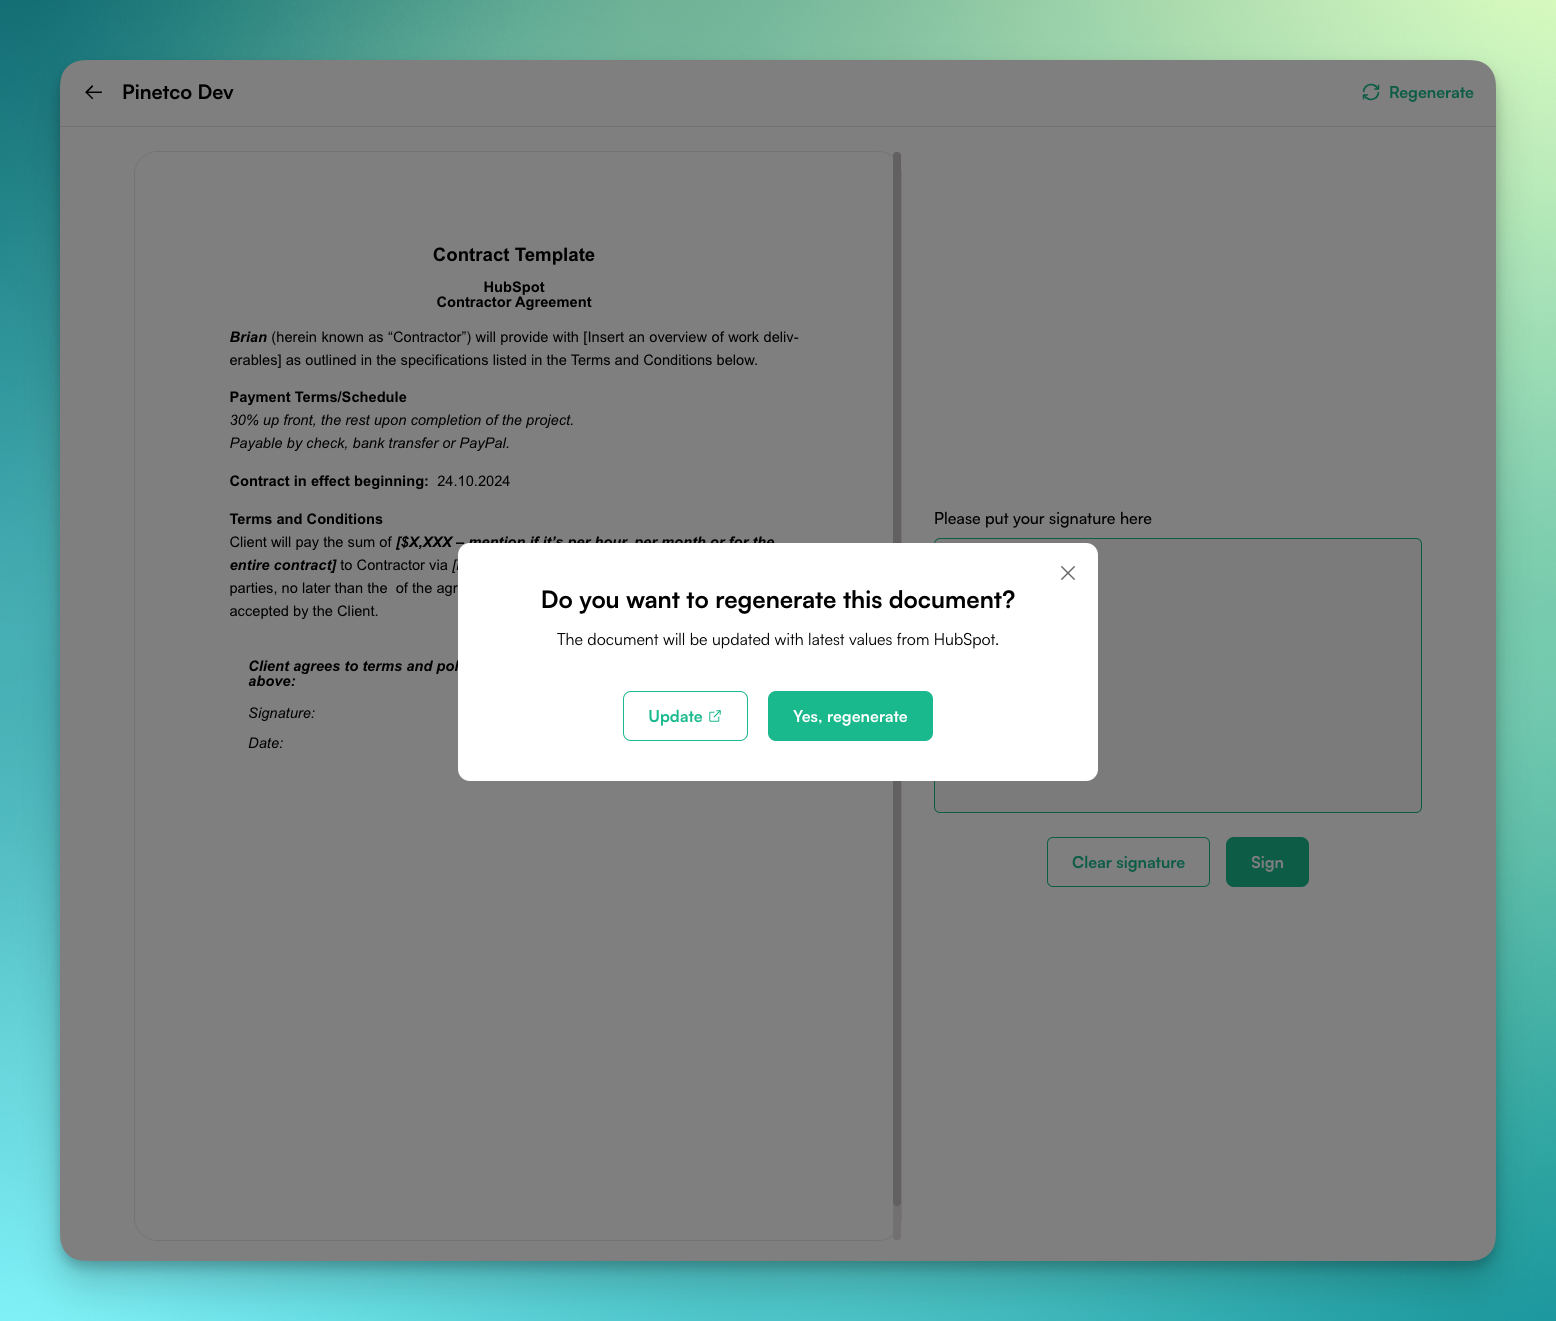
- At the top-right corner of the screen, you'll find the Regenerate button. This feature offers two options:
- Update redirects to the HubSpot object details screen.
- Yes, Regenerate will display a preview of the updated document before finalizing it.
- Once you have signed in the box, click the Sign button to complete the signing process.
- Start by opening any contact's profile for whom the document generation has been triggered.
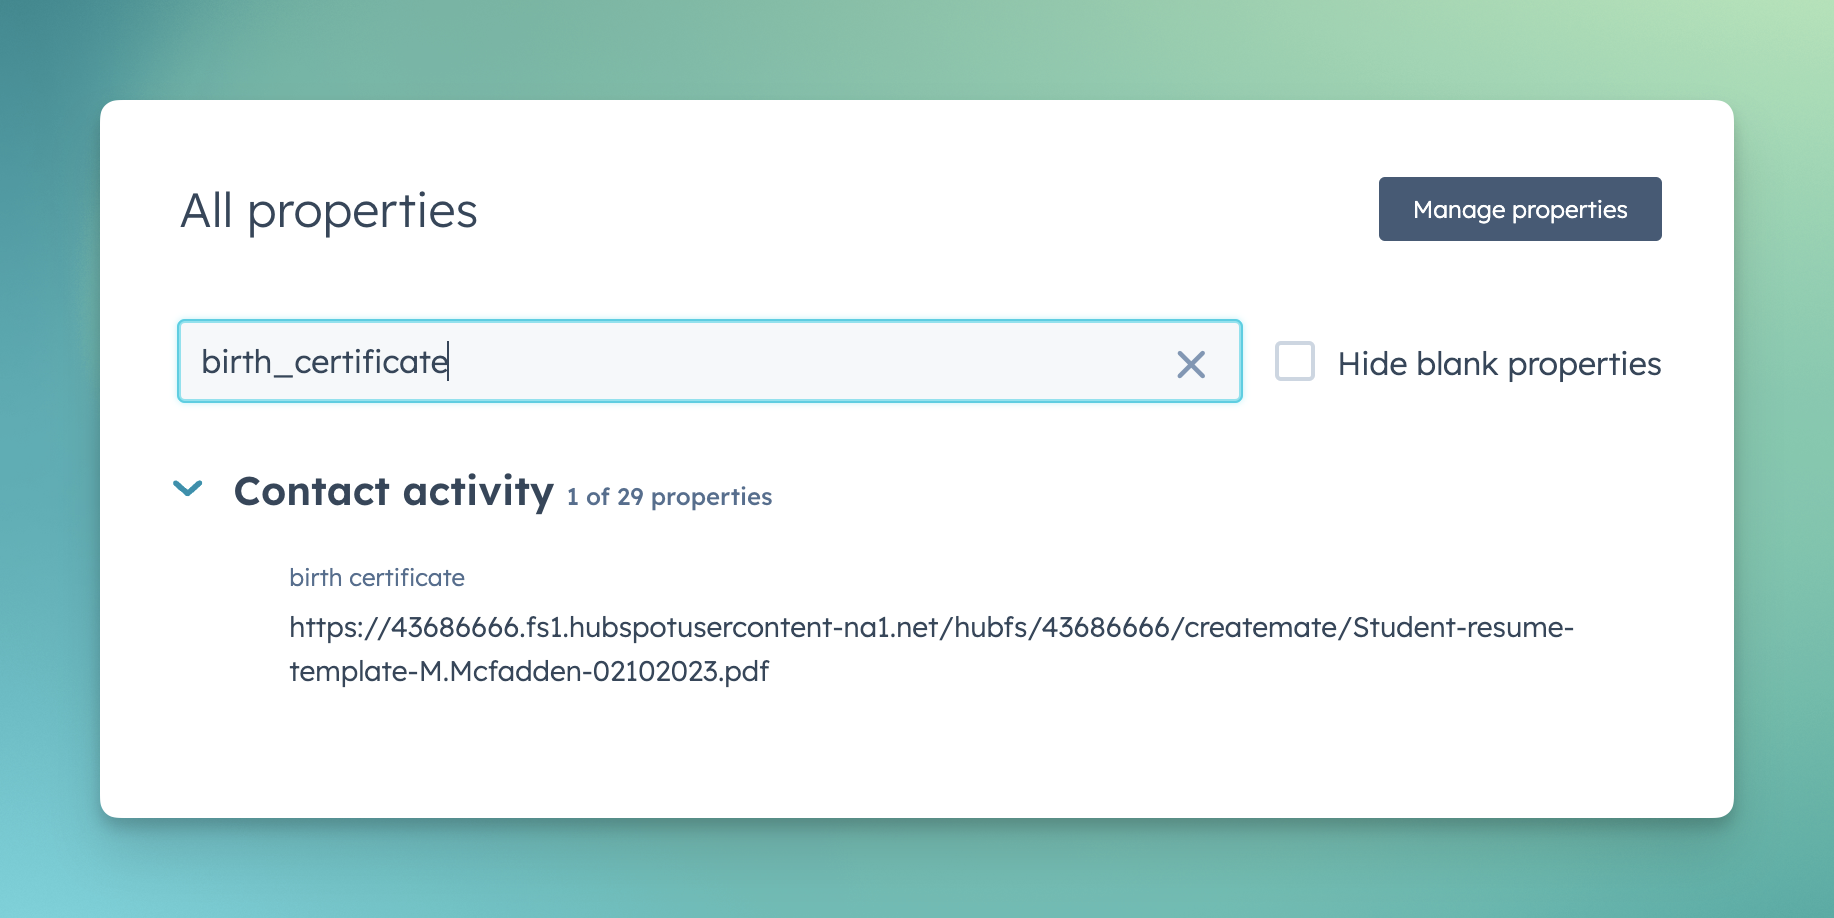
- In the search bar, input the name of the file property you designated during the template upload phase.
- Once located, click on the provided link to preview the generated document.
- This document link can be embedded into marketing emails or used for various other promotional purposes.
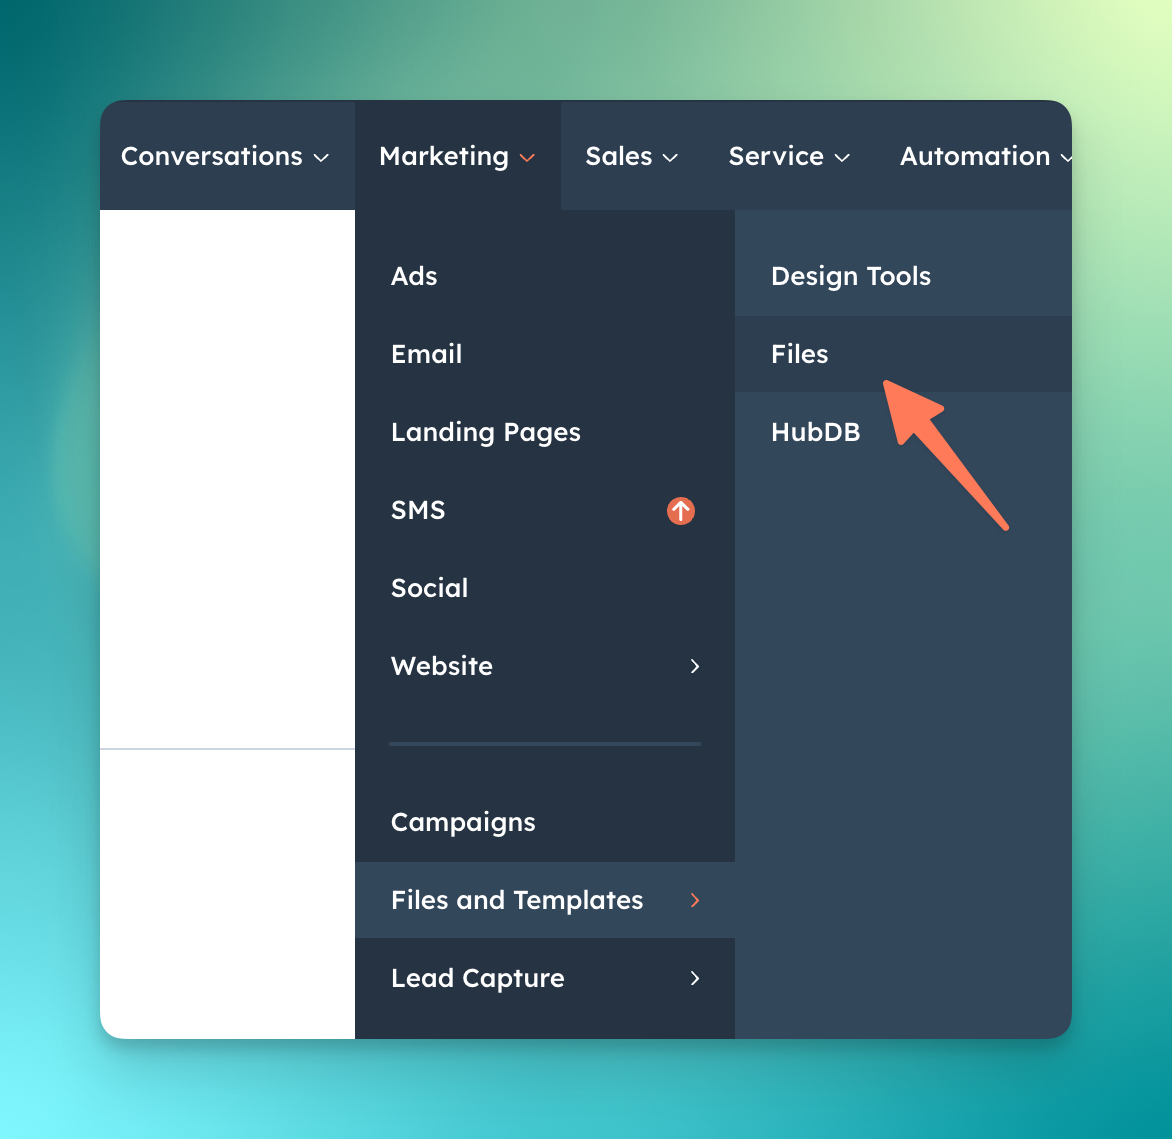
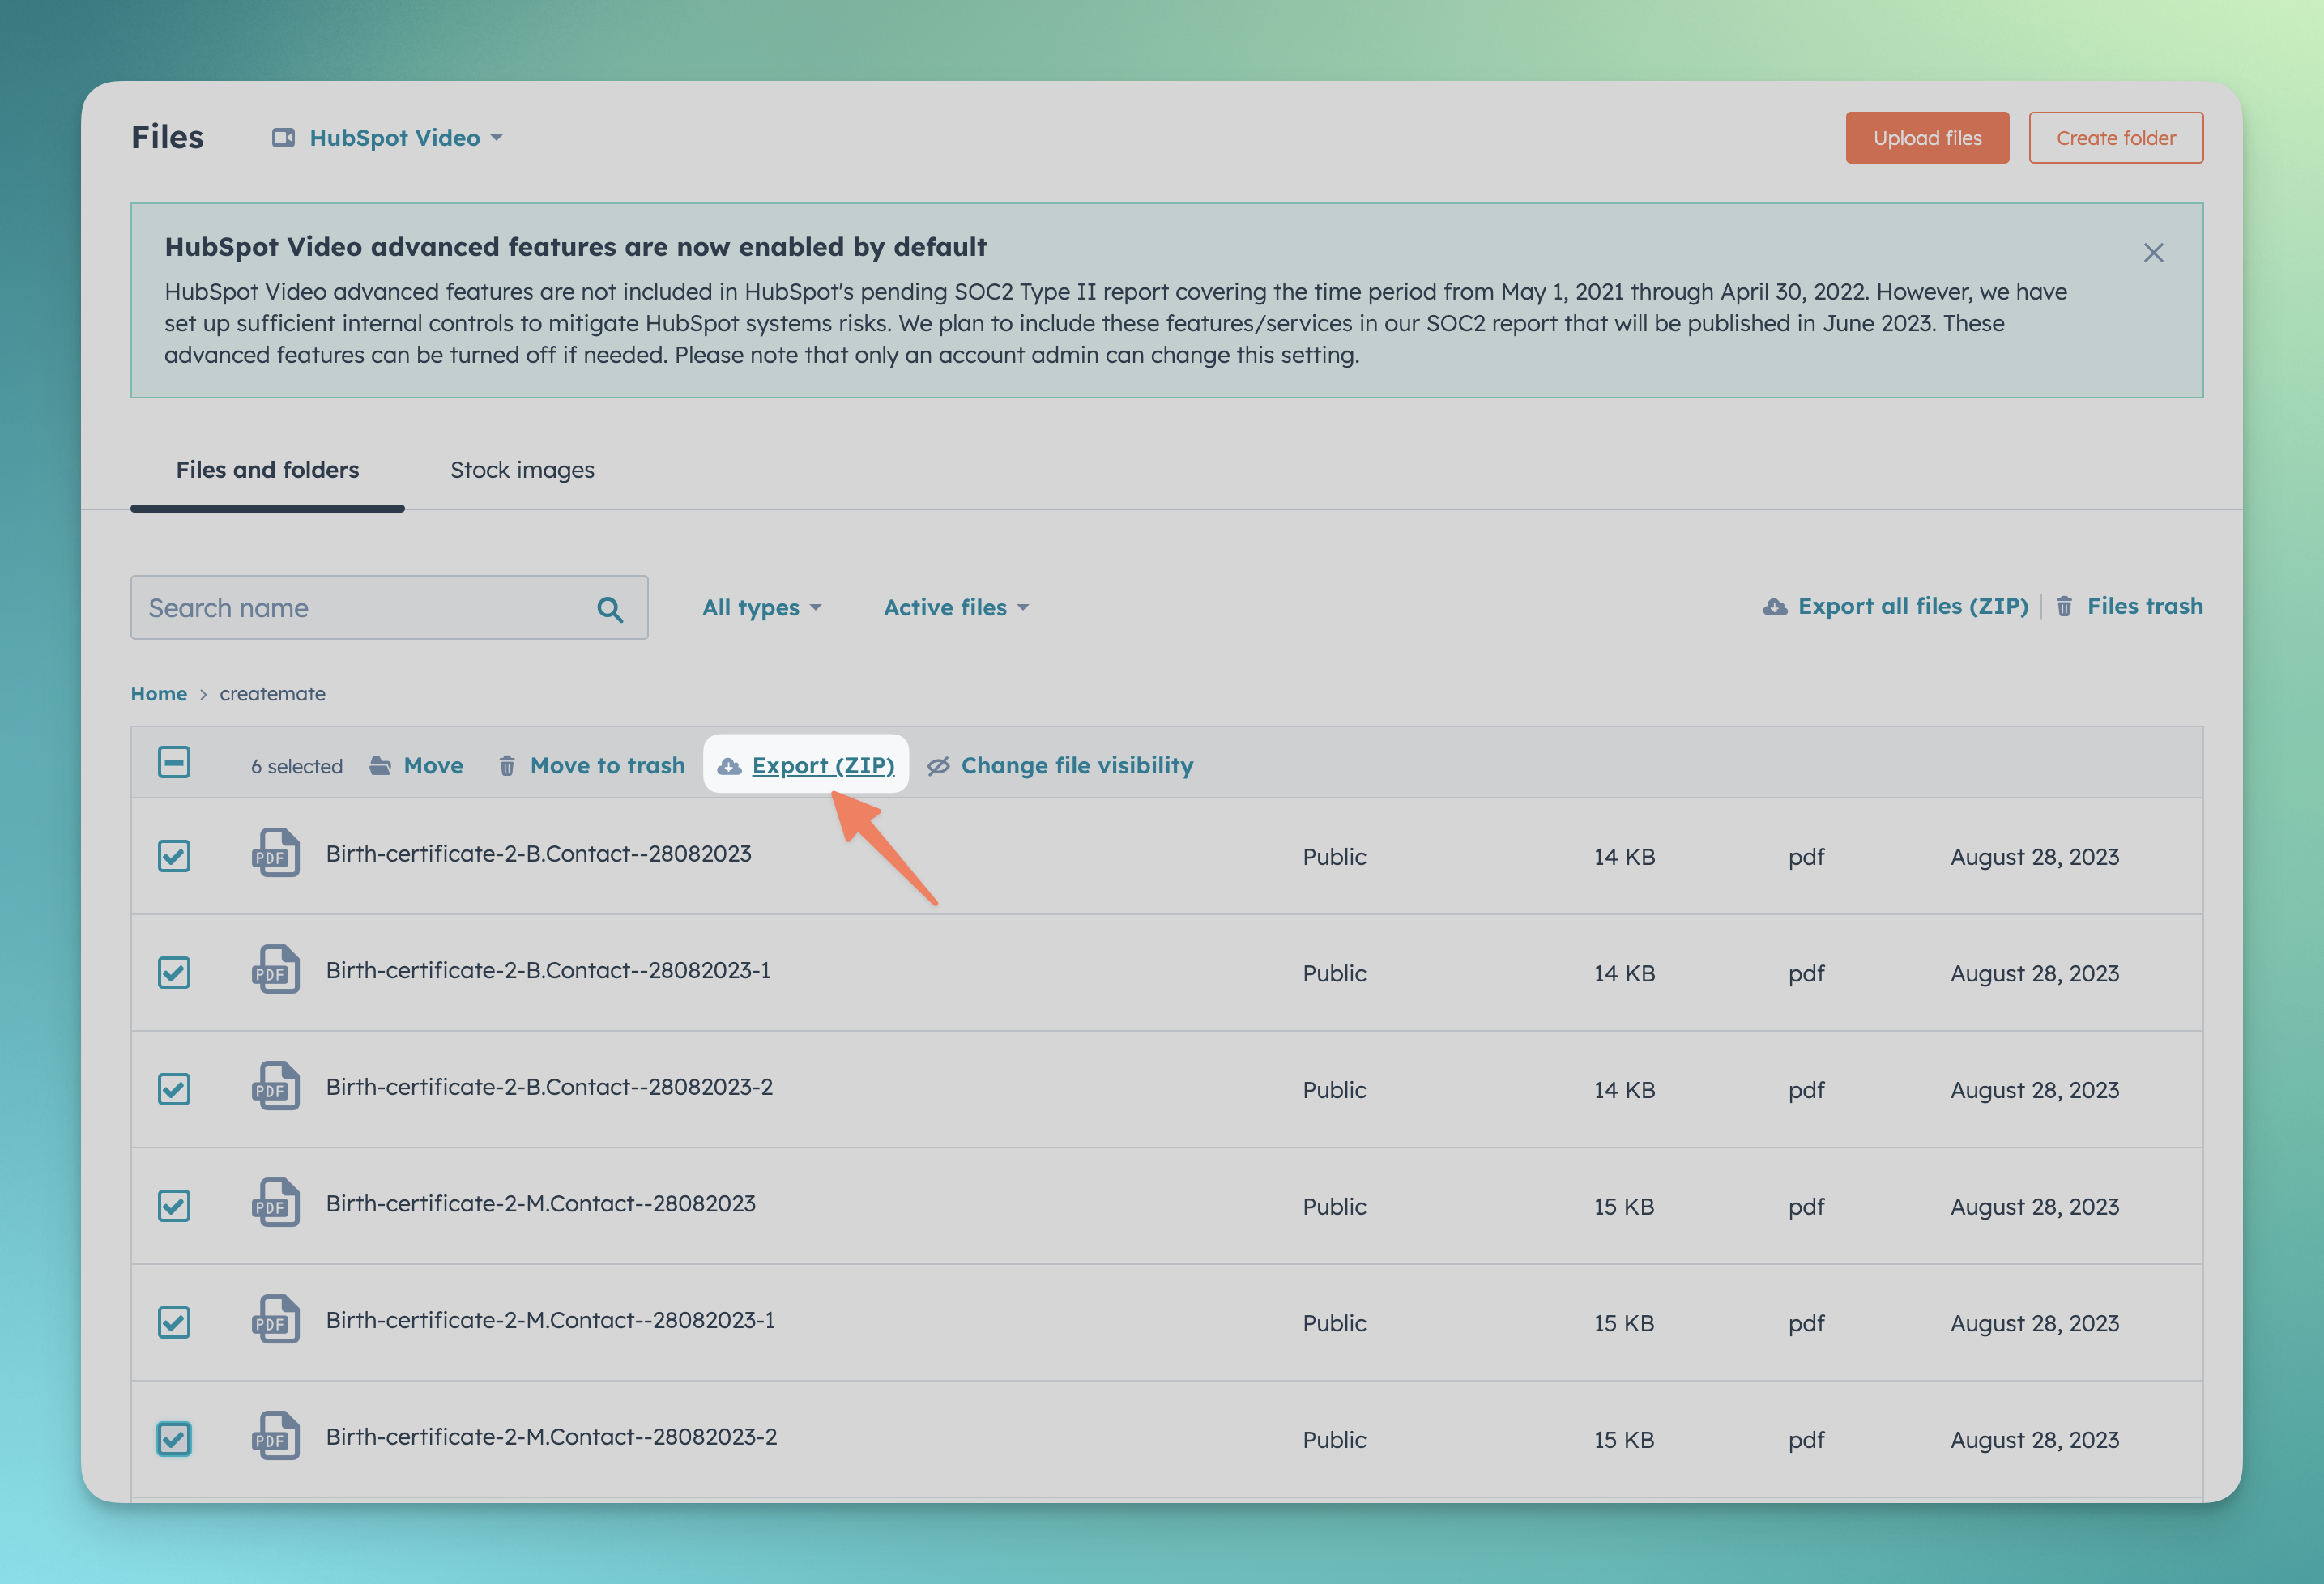
- For a comprehensive view of all the generated documents, navigate to 'Files' in the HubSpot menu. From there, you can download individual documents for any additional needs.
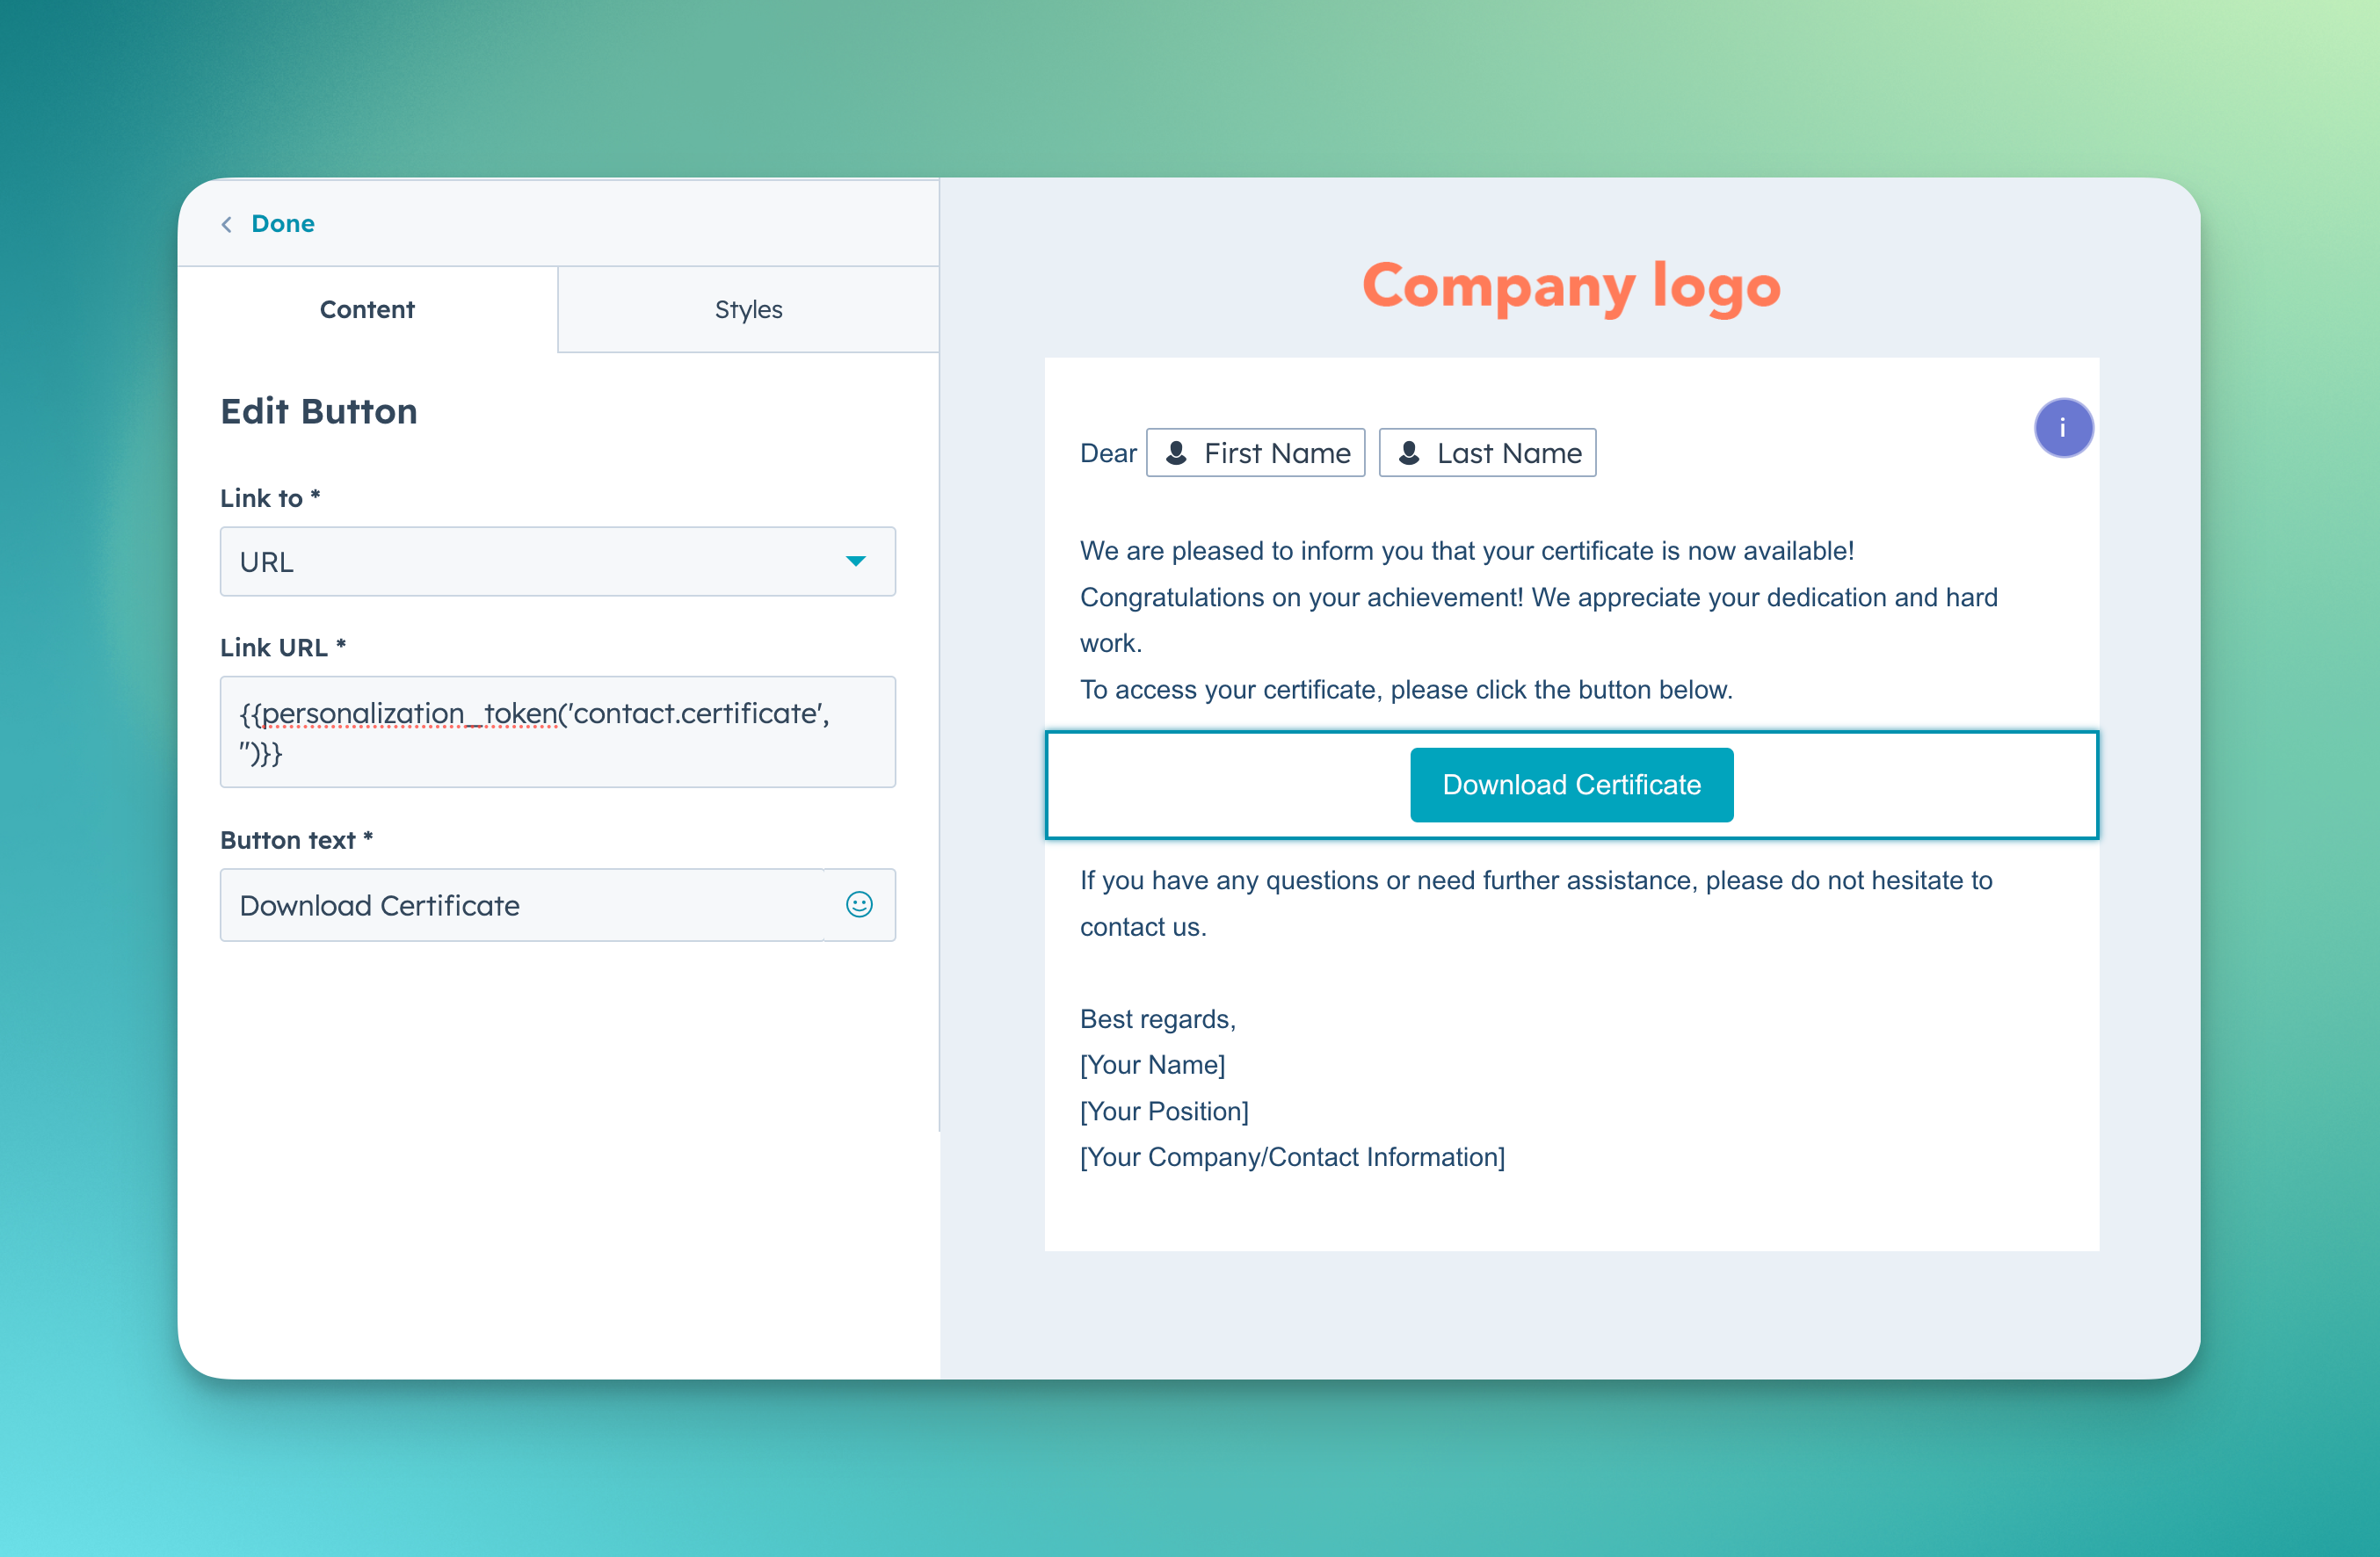
- Insert a button element into your email content.
-
In the Link URL input field of the button element, enter the following text:{{ personalization_token('contact.certificate','') }}
- contact:Refers to your object type (e.g., Contact, Company, Deal, or Ticket) and can be customized based on your specific use case.
- certificate:Refers to the storage property where the generated document is stored. Replace it with the appropriate storage property for your needs.
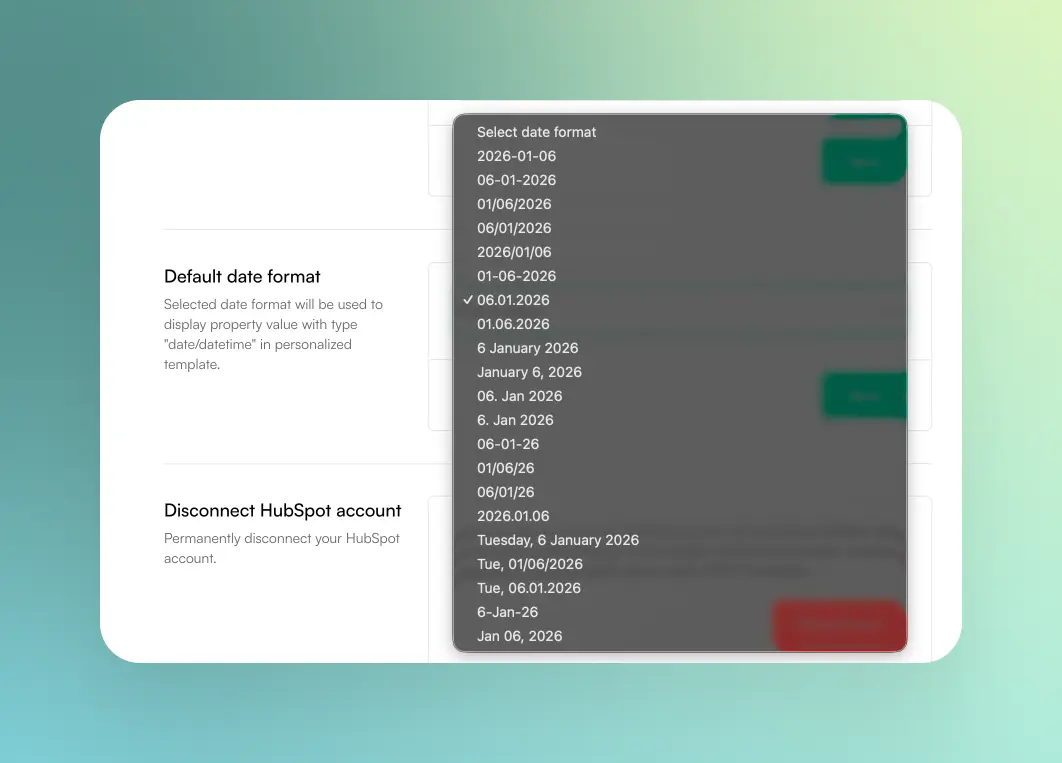
You can customize how date properties are displayed in your generated documents by setting a default datetime format. This ensures consistency across all your templates.
Setting the default date format:
- Go to Settings.
- Navigate to the Default date format section.
- Select your preferred date format from the dropdown menu.
- Click Save to apply the changes.
To ensure your custom fonts display correctly in generated documents, you must embed fonts in your Word document template. Without embedding, fonts may be replaced with default system fonts, affecting the appearance of your documents.
Microsoft Word
- Open your word document template
- Click on File → Options
- Select Save from the left sidebar
- Check the box Embed fonts in the file
- For best results, also check Embed all characters (increases file size but ensures compatibility)
- Click OK and save your document
Google Docs
LibreOffice Writer
- Open your document in LibreOffice Writer
- Go to File → Properties
- Click on the Font tab
- Check Embed fonts in the document
- Click OK and save your document as .docx
Uninstalling from HubSpot:
- Navigate to settings, then find connected apps.
- Search for PDF CreateMate in the list. Once located, click on the Uninstall option from Actions dropdown.
Deleting PDF CreateMate account:
- Head over to PDF CreateMate and navigate to your profile.
- Look for the option delete account and click on it.
For further assistance or inquiries, please reach out to us through the provided channels or simply fill out our contact form.