
Templates
PDF Forms New
PDF Forms allow you to automatically fill PDF documents with interactive form fields using data from your HubSpot records. Instead of creating a template from scratch, you can use existing PDF forms and map their fields to HubSpot properties.
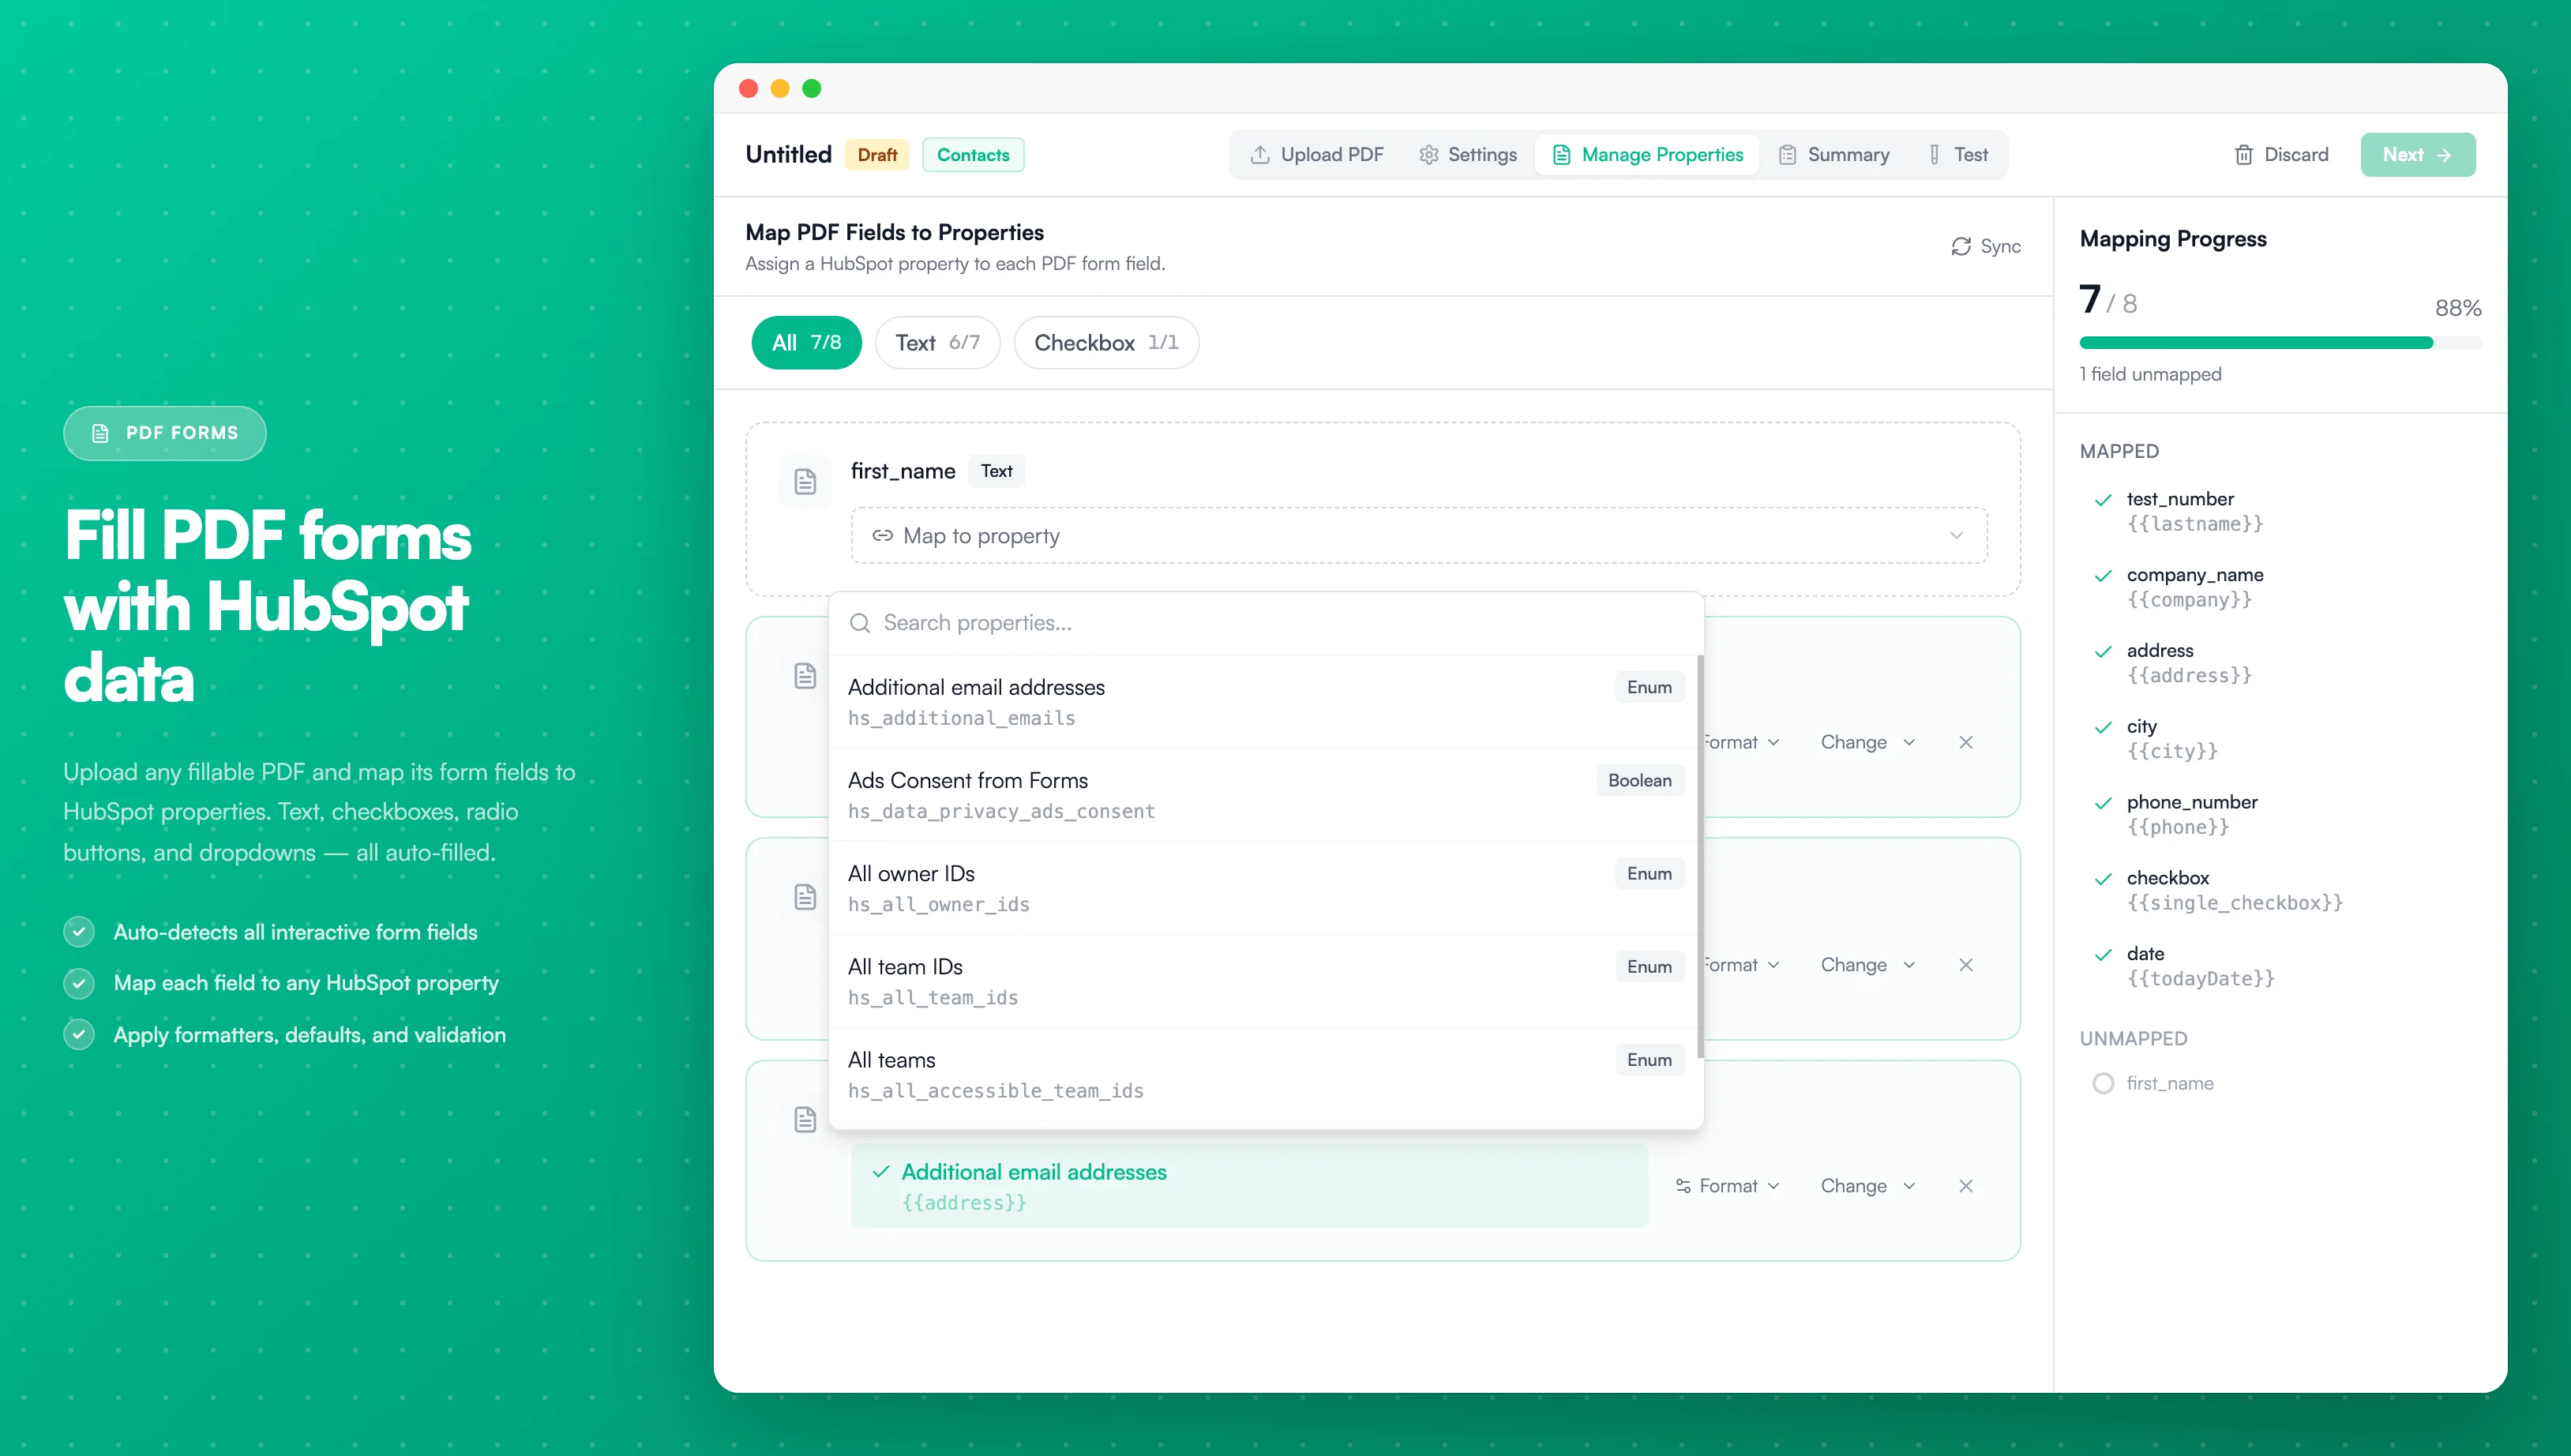
Image description
- A list of detected PDF form fields (text, checkbox, signature types)
- A property mapping dropdown for each field to link to HubSpot properties
- Filter tabs to view All, Text, Checkbox, or Signature fields
- A Mapping Progress sidebar showing how many fields are mapped
- Format and change options for each mapped field
What are PDF Forms?
PDF Forms are PDF documents that contain interactive form fields. These fields can be text inputs, checkboxes, radio buttons, or dropdown menus. When you upload a PDF form to PDF CreateMate, we automatically detect all the form fields and let you map them to HubSpot properties.
Common use cases:
- Government forms and applications
- Standardized contracts and agreements
- Insurance forms and claims
- Compliance and regulatory documents
- Registration and enrollment forms
- Tax forms and financial documents
How PDF Forms Work
- Upload your PDF — Upload any PDF that contains interactive form fields
- Automatic field extraction — We detect all form fields (text, checkboxes, radio buttons, dropdowns)
- Map to HubSpot — Connect each PDF field to a HubSpot property
- Apply formatting — Optionally format values (uppercase, dates, currency, etc.)
- Generate documents — The PDF is automatically filled with HubSpot data
Creating a PDF Form Template
Step 1: Choose PDF Form as Template Type
When creating a new template, select PDF Form as your template type.
Step 2: Upload Your PDF
Upload a PDF file that contains interactive form fields:
- Supported formats: PDF files (.pdf) only
- Maximum file size: 200 MB
- Requirements: PDF must contain fillable form fields
To upload:
- Drag and drop your PDF file into the upload area, or
- Click the upload area to browse your files
The PDF is analyzed immediately to extract all form fields.
Step 3: Review Detected Fields
After uploading, you'll see all detected form fields organized by type:
Field Types:
- Text fields — Single-line or multi-line text inputs
- Checkboxes — Boolean yes/no fields
- Radio buttons — Multiple choice fields (single selection)
- Dropdowns — Select menus with predefined options
Each field shows:
- Field name — The internal name from the PDF
- Field type — Text, Checkbox, Radio, or Dropdown
- Alternative name — Human-readable label (if available)
- Max length — Character limit for text fields
- Options — Available choices for checkboxes, radio buttons, and dropdowns
Filter fields by type to quickly find specific field types you want to map.
Step 4: Map Fields to HubSpot Properties
For each PDF form field, you can:
- Select a HubSpot property — Choose which property's value should fill this field
- Apply formatting — Transform the value before inserting (optional)
- Set a default value — Fallback when the property is empty (optional)
Mapping a Field
Click "Map to property" on any field to open the mapping dialog:
- Search properties — Filter by property name or label
- Recommended properties — We suggest properties based on field type and name
- All properties — Browse all available properties for the selected HubSpot object
Property matching:
- Field name "email" → Recommends HubSpot email properties
- Field name "phone" → Recommends phone number properties
- Field name "company" → Recommends company name properties
- Text fields → Recommends string and text properties
- Checkbox fields → Recommends boolean (Yes/No) properties
Applying Formatters
Format values before they're inserted into the PDF:
Text Formatters:
- UPPERCASE — Convert to uppercase letters
- lowercase — Convert to lowercase letters
- Title Case — Capitalize first letter of each word
- Truncate — Limit to a maximum number of characters
Number & Currency Formatters:
- Currency — Format as currency (e.g., $1,234.56 or €1.234,56)
- Specify currency code (USD, EUR, GBP, etc.)
- Set decimal places (0-4)
- Decimal places — Round to specific decimal places
Date Formatters:
- Date format — Convert dates to a specific format
- Example:
DD.MM.YYYY→17.01.2025 - Example:
MM/DD/YYYY→01/17/2025 - Example:
YYYY-MM-DD→2025-01-17
- Example:
Boolean Formatters (for checkboxes):
- When true — Text when checked (e.g., "Yes", "Approved", "✓")
- When false — Text when unchecked (e.g., "No", "Denied", "✗")
Setting Default Values
Provide a fallback value when the HubSpot property is empty:
- Static text — Use a fixed value like "N/A", "Not Provided", or "—"
- Another property — Reference a different HubSpot property
- Empty — Leave the field blank if no value exists
Example:
If "Phone" is empty, use "Not Provided" as the default value.
Step 4.5: Configure Signature Positions (If Signatures Enabled)
If you've enabled the signature feature in your template settings, you must configure where signatures should appear on the PDF.
Visual Signature Area Selection:
When signatures are enabled for a PDF template, you'll see a "Select Primary Signature Area" (or "Select Counterparty Signature Area") button in the Properties step. This opens an interactive PDF preview where you can:
- View your PDF — The PDF preview shows the first page by default
- Navigate pages — Use previous/next buttons to find the right page
- Draw signature area — Click and drag on the PDF to select a rectangular area for the signature
- Preview selection — The selected area is highlighted with a colored border
- Save position — Click "Save Position" to confirm the signature position
Signature Types:
- Primary Signature — Main signer's signature area (blue border in preview)
- Counterparty Signature — Second signer's signature area (green border in preview)
Each signature type requires its own position if enabled in template settings.
Position Details:
After selecting a signature area, you'll see:
- Page number — Which page the signature will appear on
- Coordinates — Position on the page (x, y)
- Dimensions — Size of the signature area (width × height)
Changing Positions:
Click "Change Position" to re-select the signature area at any time. The new position will replace the previous one.
Important Notes:
- Signature positions are cleared when you upload a new PDF file
- Each signature can be placed on any page of the PDF
- Signatures will be automatically inserted at the exact positions during document generation
- The signature image maintains its aspect ratio while fitting within the selected area
Step 5: Publish Template
Once you've mapped the fields you need and configured signature positions (if applicable):
- Review your mappings in the summary view
- Click "Publish" to activate the template
- Start generating documents
Mapping progress shows how many fields are mapped vs. unmapped. You don't need to map every field — only map the ones you need filled.
Supported Form Field Types
Text Fields
Regular text input fields that accept any text value.
Best mapped to:
- String properties (Single-line text, Multi-line text)
- Email addresses
- Phone numbers
- URLs
- Names and addresses
Formatters:
- Uppercase, lowercase, title case
- Truncate to max characters
- Date formatting (for date properties)
- Currency formatting (for number properties)
Checkboxes
Boolean fields that can be checked or unchecked.
Best mapped to:
- Boolean properties (Yes/No fields in HubSpot)
- Checkbox properties
- Opt-in/opt-out fields
Formatters:
- Custom text when true (e.g., "Yes", "Approved")
- Custom text when false (e.g., "No", "Denied")
How it works:
trueor truthy values → Field is checkedfalse,null, or empty → Field is unchecked
Radio Buttons
Multiple choice fields where only one option can be selected.
Best mapped to:
- Dropdown properties
- Enumeration properties
- Single-select properties
How it works:
The value from HubSpot must match one of the radio button options exactly. If no match is found, no option is selected.
Dropdown (Choice) Fields
Select menus with predefined options.
Best mapped to:
- Dropdown properties
- Enumeration properties
- Single-select properties
How it works:
The value from HubSpot must match one of the dropdown options exactly. If no match is found, the field remains empty.
Generating Documents
Once your PDF Form template is published, you can generate documents using:
- Workflow actions — Automatically trigger from HubSpot workflows (recommended)
- Manual generation — Generate one-off documents from the template page
The generated PDF will have all mapped form fields filled with the corresponding HubSpot data, formatted according to your settings.
Learn how to generate documents →
Tips and Best Practices
1. Use Descriptive Field Names
When creating PDF forms, use clear, descriptive field names that match your HubSpot property names. This makes mapping faster and reduces errors.
Good examples:
emailorcontact_emailcompany_nameoraccount_namephone_numberormobile
Avoid:
field1,field2,textbox_3- Abbreviated or cryptic names
2. Test with Sample Data
Before using your template in production:
- Use the Test feature to generate a sample document
- Verify all fields are filled correctly
- Check that formatting is applied as expected
- Ensure checkboxes and radio buttons select the correct options
3. Map Only Required Fields
You don't need to map every single field in the PDF:
- Map only the fields you need filled
- Leave optional fields unmapped if not needed
- Unmapped fields remain empty in the generated PDF
4. Handle Empty Values
Always set appropriate default values for critical fields to avoid blank spots in your documents:
- Use "N/A" or "Not Provided" for optional text fields
- Use "—" for numeric fields
- Use "No" or unchecked for boolean fields
5. Verify Field Types Match
Ensure the HubSpot property type matches the PDF field type:
- Text fields → String properties
- Checkboxes → Boolean properties
- Radio/Dropdown → Enumeration or select properties
Mismatched types may result in values not appearing correctly.
Common Issues
No Form Fields Detected
Problem: After uploading a PDF, no form fields are shown.
Solution:
- Your PDF doesn't contain interactive form fields
- The PDF might be a scanned document or flat image
- Create fillable fields using Adobe Acrobat, PDFescape, or similar tools
- Or use a Word/HTML template instead
Checkbox/Radio Button Not Selected
Problem: Checkbox or radio button field is not checked even though the property has a value.
Solution:
- For checkboxes: Ensure the HubSpot value is
trueor a truthy value (1, "yes", etc.) - For radio buttons: The value must exactly match one of the available options
- Check for typos or case differences (values are case-sensitive)
Value Not Appearing in Field
Problem: The PDF field is empty even though the HubSpot property has a value.
Solution:
- Verify the field is mapped to the correct property
- Check if the value exceeds the field's max length (it will be truncated)
- Ensure the property type is compatible with the field type
- Test with the "Test" feature to see the exact value being used
Formatting Not Applied
Problem: Formatters don't seem to work.
Solution:
- Verify the formatter is saved (check the field mapping)
- Ensure the formatter is compatible with the property type (e.g., date format only works on date properties)
- Currency formatting requires numeric values
Limitations
- PDF size: Maximum 200 MB per file
- Field types: Only supports Text, Button (checkbox/radio), and Choice (dropdown) fields
- Calculated fields: PDF form calculations and scripts are not executed
- PDF signature fields: The native PDF signature field type is not supported. However, you can add signatures to PDF templates by enabling the Signatures feature and selecting signature positions visually on the PDF preview.
- File attachments: File attachment fields are not supported
- Not editable after generation: The generated PDF is flattened — form fields become static content. Recipients cannot modify the filled-in values.